Solutions in the Power Platform

Tired of the tedious process of individually exporting and configuring Power Apps and Flows when moving them to a new Environment? We're going to explain how Power Platform solutions can help speed this tedious process up in today's blog 🙌
Intro
So, you’ve begun building Power Apps and you need to move them and the associated Flows to a new Environment, what options do you have? You could export each component individually, add them to your new Environment, then reconfigure and set everything back up. Sounds like a lot of work, right? The best solution would be to put everything together and move it all as one unit – that must be why they named the tool that does this, exactly that: Power Platform Solutions.
This blog will explore a few aspects of solutions and be an aid for citizen developers looking to practice better lifecycle management – a topic I’ll explore further in my next blog: ALM for Citizen Developers.
What Brought You Here?
I’ll focus on a few different features of solutions depending on your motivations for learning about them. This isn’t a recipe blog, so I’ll help you skip ahead to the exact section you want (but feel free to stick around to learn more).
1. "I need to move apps and flows between Environments."
- Basic navigation and components of solutions
- Exporting and importing solutions
2. “My IT department tells me I need to be using solutions.”
- What they likely want you to know
- Good practices to follow
3. “I want more details on solutions.”
- Features like child flows, environment variables, and connection references
Moving Objects Between Environments
You have some apps and flows in one environment and need them to be in another? Maybe because you have a development environment and one for production or because they’re just not where they should be. Pack your solution like a U-Haul and let’s get your components to their new home.
What Are Solutions?
They allow your various objects, like flows and apps, to be grouped together and share context. Think of them like a folder... or maybe like a container. You can export everything, as a single unit, and import it elsewhere; it’s much easier than manually exporting multiple apps and flows and moving them individually. They also provide some great features that are not available outside of solutions!
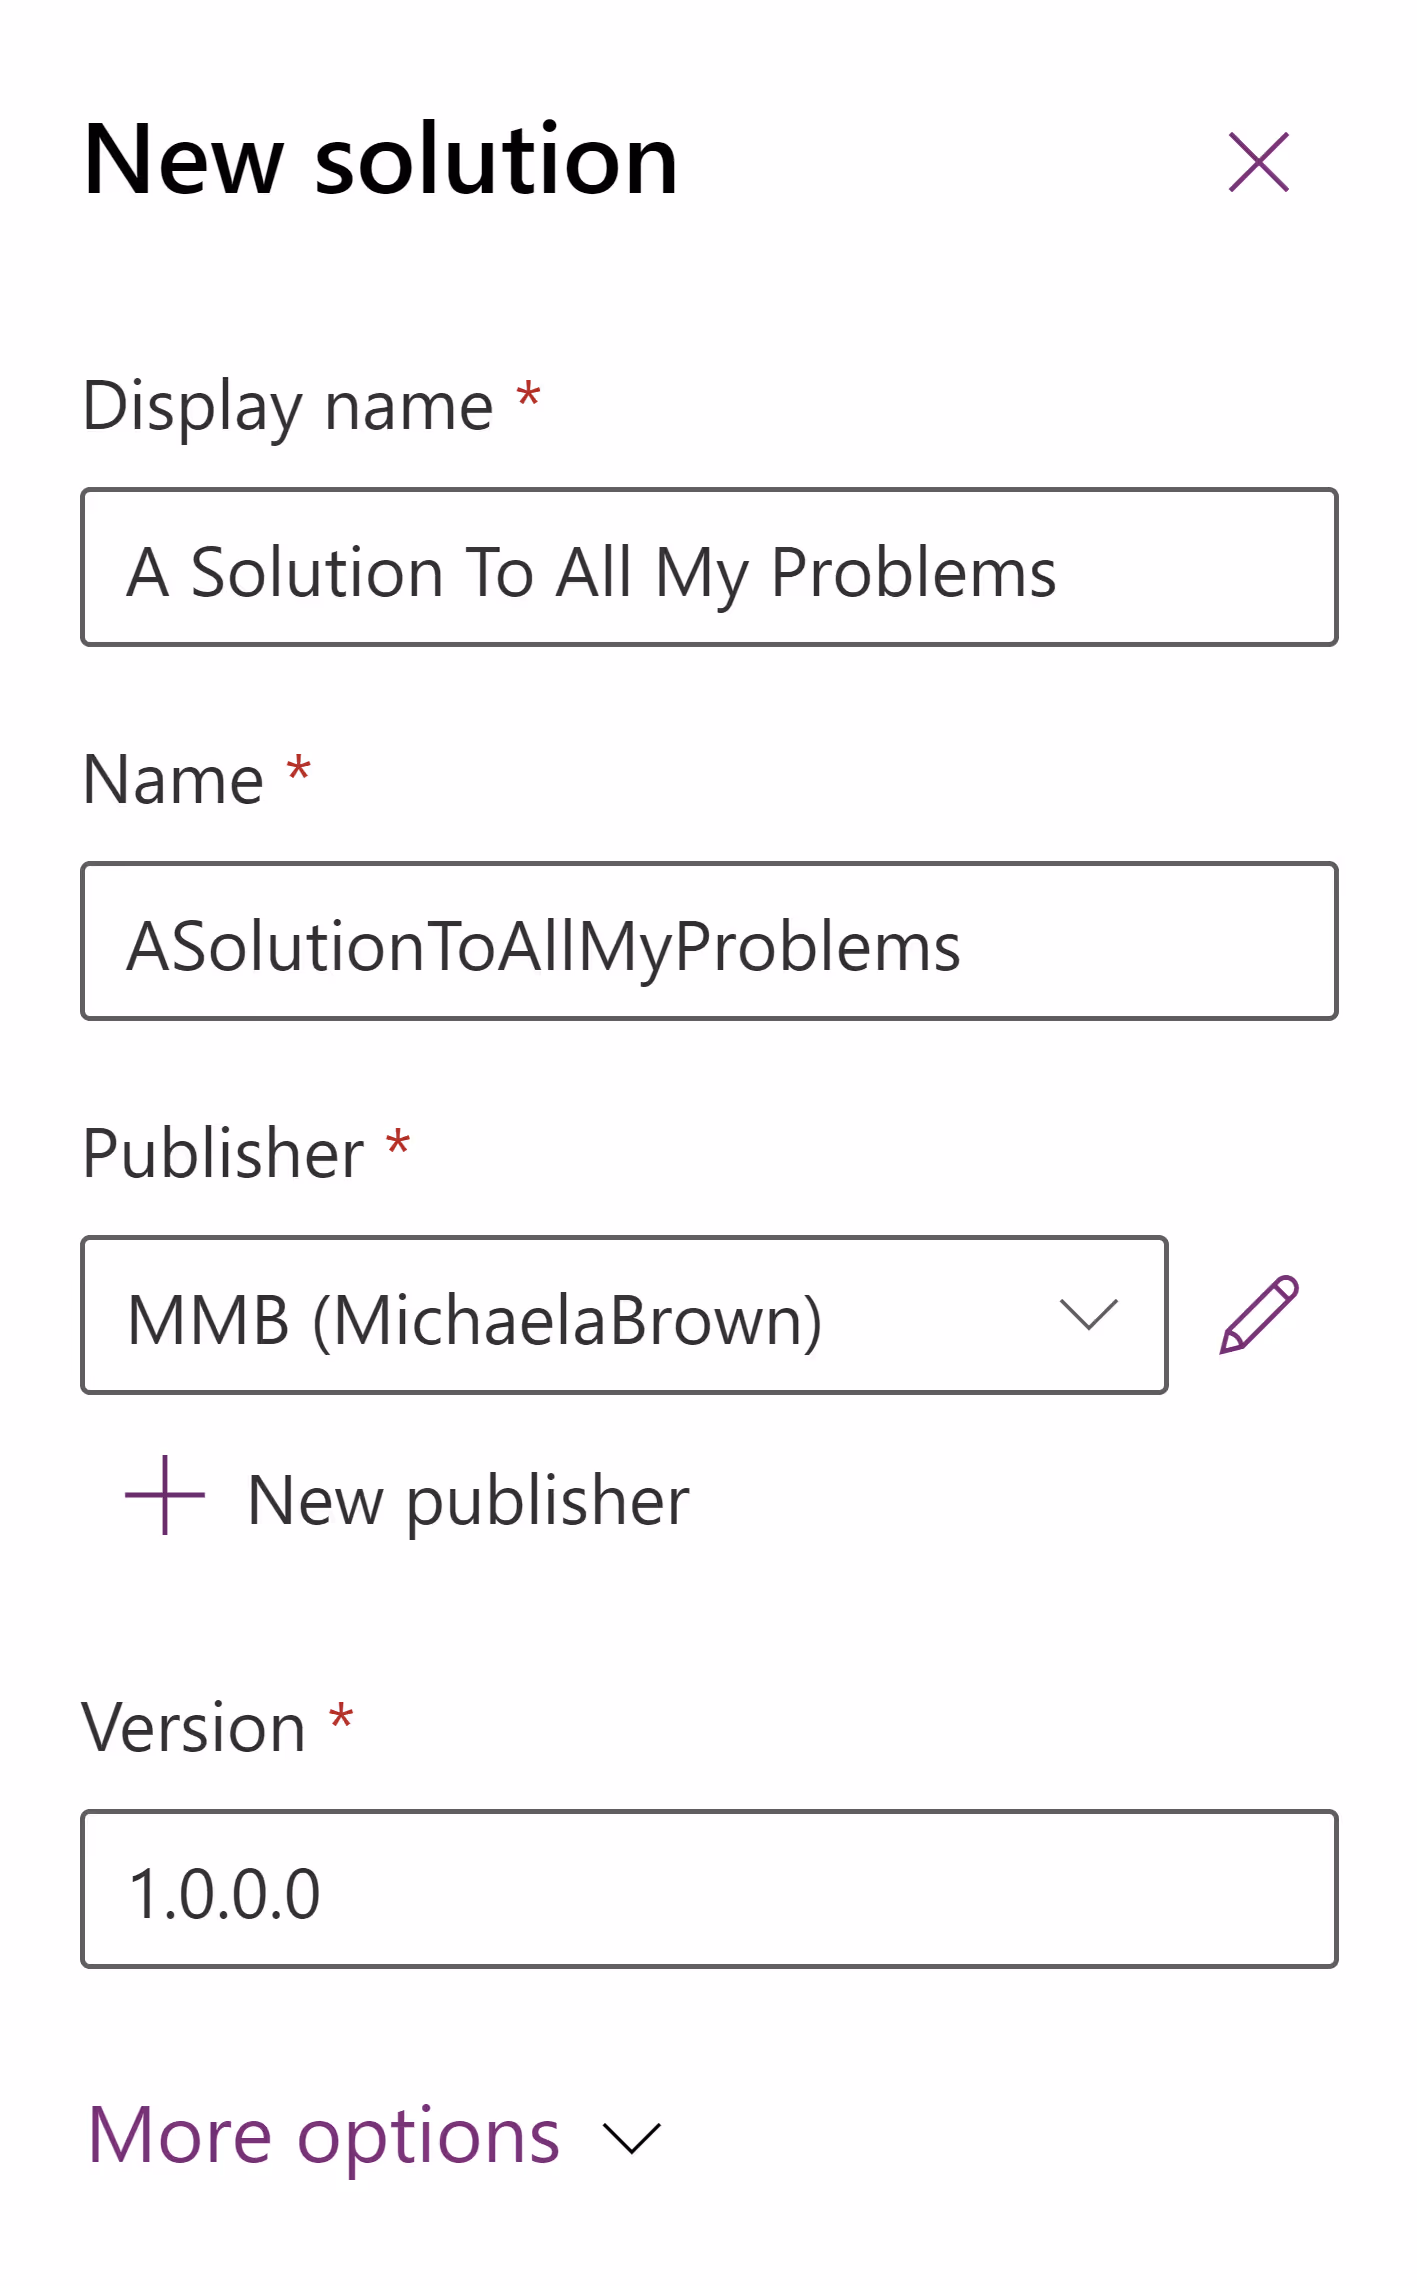
Create a New Solution to Put Your Objects In.
Go to make.powerapps.com and navigate to the environment where your apps and flows currently exist. In the left side navigation menu, click on “Solutions” and you’ll be brought to a list of the solutions installed in this environment.

Press the “New solution” button at the top of the page and fill out the display name with a project-specific name that describes the apps and flows you’ll put inside. As you type in the display name, the name field will populate without spaces or special characters. Then select an appropriate publisher and click “Create.” If you don’t already have a publisher for this solution, creating a new one is simple – press the “New publisher” link and fill out the information. If you’re unfamiliar, check out Microsoft’s documentation about publishers to understand more details.
Once you’ve created your solution, you’ll have a new left side navigation menu titled “Objects;” it has various categories such as Apps, Chatbots, Cloud flows and Tables. As you add additional types of objects to the solution, you’ll see more categories added to this menu.

SELF ASSESSMENT
Is your business getting full value from your M365 subscription?
Billions of dollars are wasted each year on underused subscriptions. Take 3 minutes to find out where your tools are driving results, and where they’re holding you back.
Find Out Now
Is Team Communication Holding You Back?
Find Out in Just 2 Minutes.
Take our quick scorecard to uncover communication gaps and hidden barriers within your team.
Add Objects to Your Solution.
In this exercise, I’m assuming you have already created your flows or apps, so click “Add existing” at the top of the page and select the appropriate type of object from the list. It’s possible you’ll see “No objects found” when you first try to add something to the solution – don't panic, there are a few reasons you may be seeing this.

The most likely reason is that your objects exist outside of Dataverse; click the “Outside Dataverse” tab and see if you can find what you’re looking for there. If you still can’t find the object you’re looking for, review Microsoft’s Documentation on known limitations. (Remember, you must be in the same environment where these objects already exist.) Repeat this until you have all the objects related to this project in your solution.
If you need to create a new object, click the “New” button, select what you need from the list, and everything should be familiar from there.
Export Your Solution.
Once everything is in the solution and it’s ready to go, we can export it. Go back to solutions list, click three dots next to your new solution, and click “Export solution.” Publish your changes; all saved changes will be published, so make sure everything is updated as it should be. Once it has processed, click “Next.”
The version number will auto-increment, I suggest not changing this. You will have to choose between exporting a managed or unmanaged version of your solution. Microsoft’s documentation can provide more details, but a quick way to think of it is that managed solutions are read-only while unmanaged solutions are used for development. If you are moving between development environments, choose an unmanaged solution; if not, you likely want a managed solution.
Click “Export,” the side pane will close and a gray banner will be displayed at the top of the page. Wait for the banner to turn green and click “Download” to download the ZIP file. (I suggest dismissing the banner after you’ve downloaded it – I've accidentally downloaded the incorrect file before and published the wrong version to a test environment, oops.)

Import Your Solution.
Go to the environment where you will be importing your solution. (If you’re unfamiliar with environments, you’ve likely only been working in the default environment for your tenant. Click the globe icon in the top banner of the screen to pull up a list of available environments and check out Mike’s blog to understand more.) Once you are in the correct place, click “Import solution” and select the ZIP file you just downloaded. The name of the file will be the name of the solution, followed by the version number and the type of solution you exported (managed or unmanaged).

Next, you’ll be able to review details about the solution. And on the next page, you’ll be able to choose or create new connections – this is a great feature of solutions. If you were importing each object individually, you would have to update connections for each item; with solutions, you only have to do it once! If you’ll be running automations from a service account you have access to, import the solution from that account so you can choose those connections. On the next page, you’ll be able to populate any empty environment variables in your solution. (If you haven’t used these before, Mike has another blog about them that’s very helpful! They’re a great tool.)
Once you’ve imported your solution, you can view its objects by clicking it in the list of solutions. If you’ve shared app URLs, know that those will point to the original apps; you will need to share the new URLs to items within the new solution.
Your IT Department Instructed You to Use Solutions.
Great! But why do they want this? Let’s go over a few things that may be in play.
Application Lifecycle Management (ALM) is a likely motivator for this instruction.
Solutions are a main tool to facilitate ALM within the Power Platform.
I have a blog that dives deeper into this concept if you're new to it, but to briefly summarize ALM in this context, it is a system of best practices that creates separation between components that are in development and ones in use by end users. Consider this situation, you’ve created a canvas app that collects support requests for your team and your entire organization is using it, but now, you want to add in a feature that allows users to upload screenshots. There is only one version of the app, it’s in an unmanaged solution and folks require (and expect) it to work, otherwise they can’t receive the support they need.
How are you to make seamless changes without impacting user experience? Once the changes are made, how are you to test them to ensure they function before handing it off to end users? This is the frustration of not following ALM. My solution was to make the changes late at night and frantically test before the next day. Then I had to ask my team to delete all the support requests labeled “THIS IS A TEST – PLEASE DELETE!"
It was not ideal and not foolproof; I ran into issues later when my flows were failing with real support requests. The consequences were not worth skipping a bit of work in the beginning. If I’d followed some basics of ALM, I could have made changes in my development version of the app, tested everything in the test version, and then patched the production version without the users running into issues. I also could have maintained a separate data source for these “fake” support requests and my team would not have had to weed through the results of my testing.
- A benefit of this is making sure that your test and production solutions are managed. When solutions are exported (from development) as managed, they essentially become read-only packets when they are installed in a new environment.
- It is possible your organization has an ALM protocol that includes review and approval steps that may be required prior to deployment to a test or production environment. A review of changes at this stage would provide a chance to identify any security risks and to ensure the features being deployed meet owner requests.
Solutions provide a method for IT departments to see what components are installed in an environment.
This helps departments maintain security in their tenants by identifying any risks regarding specific connectors and how they are used. Since solutions organize objects, similar to folders, it is much easier to browse related entities and components in one place, rather than searching for buried relationships.
Solutions also help facilitate collaboration on development projects.
Within a dev environment, multiple users can work on the same project together, without sharing individual components. This is especially useful when projects have a large scope that requires multiple apps, flows and connection references. Additionally, if using a service account, the flows can be run as the account rather than on a per-user basis when the connection references are configured properly within the solution.
You’ve Encountered Solutions Elsewhere and Want to Know More.
Child flows were my introduction to solutions. I was fairly new to Power Automate and wanted to use a child flow but didn’t understand why I couldn’t find the “Run a Child Flow” action. After reading up on it, I learned that they could only be used within the context of solutions. Outside of this, I didn’t understand what else they could be used for – now that I’ve spent time with them, I know there are a variety of other features they have.
Child flows – the best flows – are a great, time-saving tool.
These only exist within the context of a solution and cannot be created or triggered from the Power Automate studio, outside of a solution. They are a method of “daisy-chaining” flows; one flow can trigger another (or more) and even pass information into it. They are exceptionally useful when your processes involve complex lookups or repetitive information processing. If you find yourself writing the same flows over and over again, consider using a child flow instead.
Environment variables are variables that can be referenced in the objects within your solutions and can be used across multiple apps and flows.
Similar to child flows, they allow you to reduce the amount of work needed and to make changes in a single place, rather than in multiple components. These are especially useful when it comes to ALM; you can designate different data sources for each environment so that your development or test data does not mix in with your real, production data. For more information, check out Mike’s blog on this topic.
Connection references are another tool available inside solutions.
Connection references provide a connection for your actions and triggers in flows, and like environment variables, can be referenced across multiple flows. Using these allows you to update references in bulk, rather than going to each action and trigger manually to update the connection. Like child flows and environment variables, they are a time-saving tool that becomes even more helpful as your project grows larger.
There are a few limitations when working with solutions, specifically with existing flows and apps; luckily, Microsoft has documented these and provided a few workarounds. For example, there are certain things that cannot be retroactively imported into a solution, like a canvas app triggered flow. It is best practice to maintain a habit of working on your solution-based components from within the context of the solution to avoid this issue. Avoid creating flows and apps outside of the solution and importing later to avoid headache and extra work.
Conclusion
Developing within solutions in the Power Platform provides some great tools that are not available if your objects are not within a solution. These tools offer scalability and time-saving functionality to help you develop and modify projects faster and more efficiently. The ability to follow ALM practices also helps relieve potential frustrations for end-users when an inevitable feature change or addition is implemented. And even if you weren’t to leverage any of these tools, solutions provide an organized folder-like structure for your projects.
I’ve said it about canvas app containers, and I’ll say it about Power Platform solutions: “you should always use them.”


.jpg)