.avif)


Enhancing Your Apps with Business Process Flows

Model Driven Apps give your data a place to live, but Business Process Flows bring your data to life. Let's see how in today's blog.
Introduction
Model Driven Apps (MDA) bring your data to the forefront of the user experience by providing a great user interface for interacting with large, complex datasets within Dataverse. They’re quick to configure, have a variety of out-of-the-box controls, and even intuitively display relationships across tables. But organizations and business are more than just rows of information; they’re also sets of nuanced processes that accomplish various tasks.
Business Process Flows help your people connect to the procedures within their jobs and also provide a platform for accomplishing that work. Let’s streamline these processes to create structure and automatic organization of the steps we need to take to get work done!
Business Process Flows Provide a Guide for Your Users
BPFs are displayed in Model Driven Apps as stages in a linear progress bar across the top of a form. By clicking a stage, users will see the individual steps within it. They also store other information in Dataverse about the process itself, which can provide powerful utility for those more familiar with the advanced features of Power Automate and Dataverse.
Track progress
- By nature of the tool, it collects data to track the progress of a process.
- Because of its design, it provides an intuitive way to view progress and the data associated with it in a single place.
Set clear expectations
- It’s stepped and organized, so users know what is expected at each stage along the way.
- It’s not adjacent to the data they are interacting with, it’s not a help text; BPFs provide direct input into Dataverse tables.
Run multiple processes with multiple users
- You can run multiple BPFs at the same time; for example, accounting may be setting up a new employee’s payroll while IT sets up their new computer.
- Since the information related to the progress of the BPF is stored in Dataverse, a process can be handed off to other team members seamlessly. It picks up right where the previous user left off.
Scale with your data
- You can span various tables in one process, so BPFs can scale to match the complexity of the data.
Step 0: Read Mike’s Blog about Model Driven Apps
Business Process Flows exist within Dataverse and are made to live on the Model Driven App (MDA) user interface. If you’re new to MDAs, Mike’s blog will walk you through their setup and provide an intro to Dataverse, as well. Once you’ve gone through the preliminary work of creating your data structure and setting up an app with Mike, come back here so you can walk through the next steps with me.
Step 1: Outline Your Process
The user interface for creating a BPF isn’t the best place to draft your ideas, so let’s outline the process in a better format. Create a flow chart or a written outline; you could use tools like Whimsical or you could sketch it out on paper - either way, write it out and outline the process from start to finish. If you’re collecting or storing any data, list the table and column this info belongs to.
For my example, I’m choosing the process of having service work performed on a facility based on a maintenance request a tenant submitted.
Here’s My General Outline
1. Review maintenance request
- Tenant – Lookup Column
- Location – Lookup Column
- Request description – Multiline Text Column
2. Schedule work
- Vendor – Lookup Column
- Work Scheduled date – Datetime Column
3. Close request
- Work Complete date – Datetime Column
- Follow up with tenant – Yes/No Column

SELF ASSESSMENT
Is your business getting full value from your M365 subscription?
Billions of dollars are wasted each year on underused subscriptions. Take 3 minutes to find out where your tools are driving results, and where they’re holding you back.
Find Out Now
Is Team Communication Holding You Back?
Find Out in Just 2 Minutes.
Take our quick scorecard to uncover communication gaps and hidden barriers within your team.
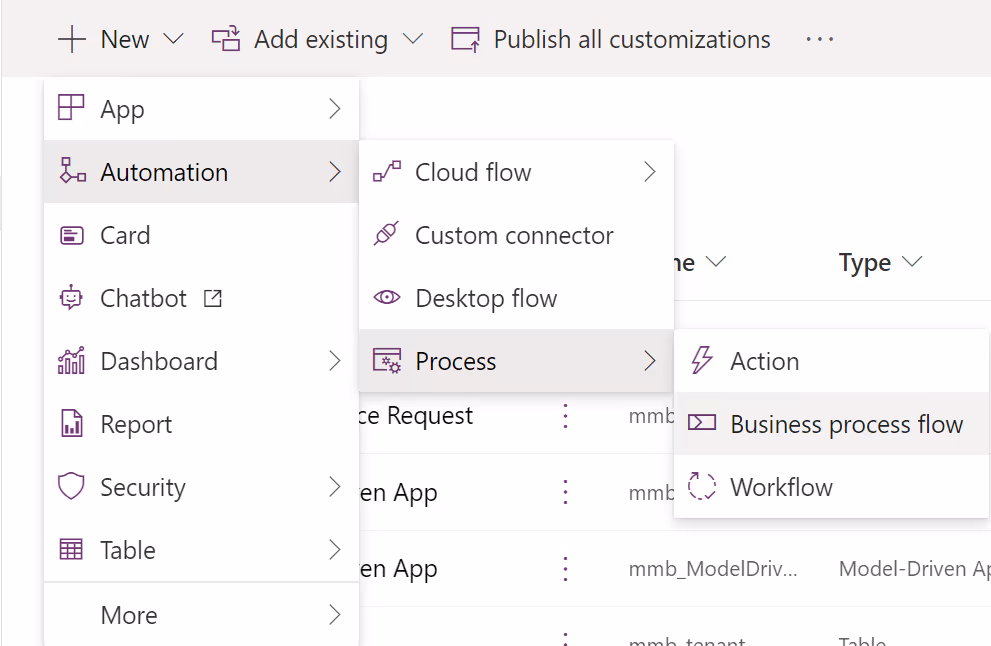
Step 2: Create a Business Process Flow
Within the solution that contains your Model Driven App, click New > Automation > Process > Business Process Flow. Then give it a display name, a logical name and select the table that this process is related to.
Once your new BPF is created, you’ll be taken to a UI that looks similar to the interface for business rules; it functions similarly too, so keep that in mind, as it’s less intuitive than other interfaces that have gotten updates more recently.
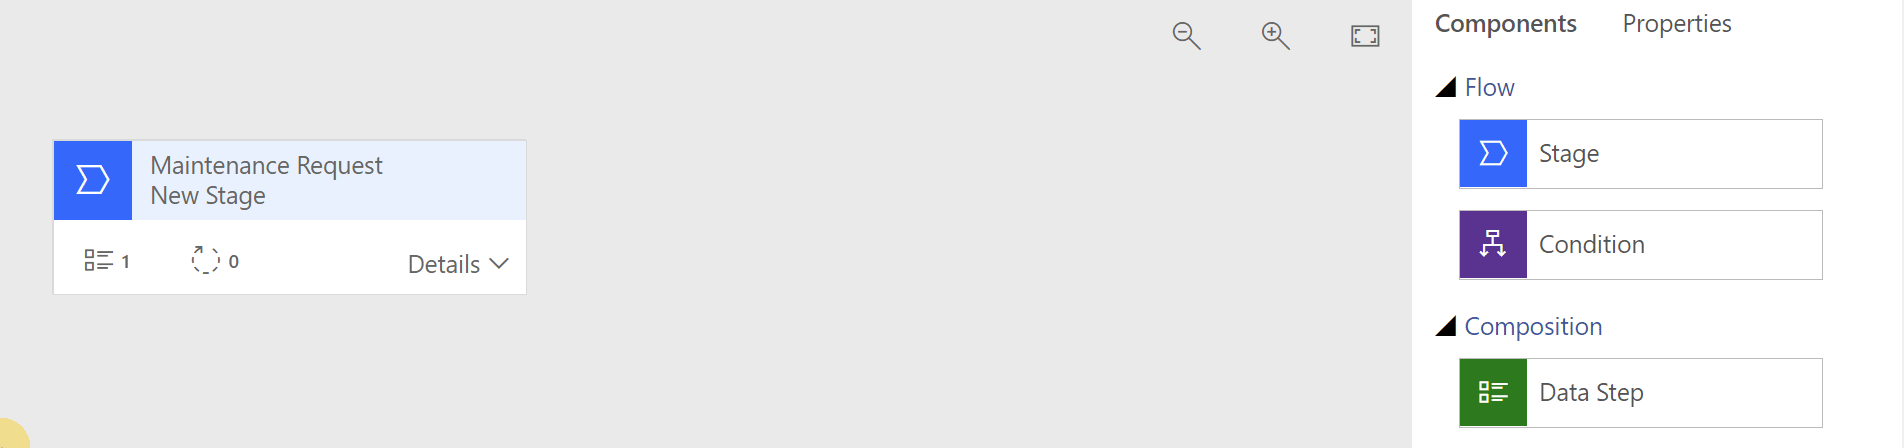
Overview of Components
Down the right side, we’ll see a panel of components – these are the parts that make up your Business Process Flows. For this demo, I’ll only focus on the first in each category: under “Flow,” Stage and under “Composition,” Data Step.

The first category, “Flow,” contains components that exist at the top level of the BPF; these can be placed directly on the screen. The components in the second category, “Composition,” can be nested inside the blue Stage components once they’ve been placed on the screen.
- Stage – This is the highest level of the BPF and the part that displays the progress. In my outline above, I have three main stages listed, these will translate to be three blue Stage components with display names as I’ve listed above.
- Condition – This component allows you to create branching based on values input in earlier stages of the BPF. For example, if I provided in-house maintenance work, I could add a choice column to select whether it would be in-house or vendor work, and branch with specific stages related to each choice.
- Data Step – Think of these as fields in your forms. They input data directly into the record, just as a form does, but here, they’re organized to follow a timeline of stages. They can be required or optional relevant to the stage, not to the table requirements. For example, I could require that a vendor is chosen before I progress to closing the request, but this is not a required column at the table level.
The rest are more advanced components and require additional setup outside of the BPF, so I won’t go into detail on how to use them within this intro article.
- Workflow – These are used to automatically trigger workflows upon the entry or exit of a stage or when a process is activated or archived.
- Action Step – This step allows users to manually trigger Dataverse actions from a button within the BPF user interface.
- Flow Step – Users are able to execute a Power Automate flow in a manner similar to using the manual trigger of a flow. At the time of writing, this component is in preview.
Add Stages to Your BPF
From the components pane, drag the appropriate number of stages onto your screen, then change the display names to match the stages you outlined previously. Important note: you must press the blue “Apply” button at the bottom of the properties pane every time you make an edit to any component.
Add Data Steps to Your Stages
For each stage, add the number of data steps you need to complete each stage. Based on my outline, I’ll need three in the first stage and two in the second and third stages. Similar to adding stages, these can be dragged onto the screen – just make sure to drag them onto the stages.
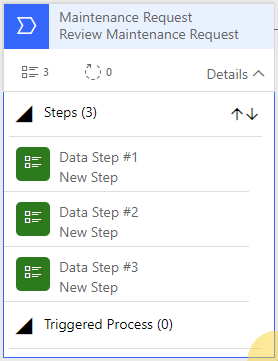
Click “Details” on your stage to expand the component and see the data steps, select and configure each data step to point to a column on your table. You can only select columns on the table that the parent Stage is referencing. If your Business Process Flow spans multiple tables, you will need to have a separate stage for each table. You can choose to make these fields required or optional – if they’re required, they must contain data before users are able to proceed to the next stage.
Activate your BPF
The final step! Once you have everything on your Business Process Flow, press the “Validate” button in the top command bar. When you’ve received the green “validation successful” banner at the top, press the “Activate” button. You’ll receive a prompt titled “Process Activate Confirmation,” press the blue “Activate” button and wait for the old school loading bar to finish. At this point in the process (and every single time I activate a BPF or business rule), this sound clip plays in my head.
If that button in the top command bar now says “Deactivate,” we can add it to our app!
Step 3: Add the Process to Your App

Back in your solution, edit the Model Driven App you want to add your process to. Once in the studio, click the “Automation” tab on the left-side pane. At the bottom, a toggle “Include all business process flows in this app” may already be turned on. Check to see if your BPF is listed under “In this app.” If it is not, click the ellipsis by your BPF and select “Add” from the menu.

Save and publish your app, then play it so we can see what we’ve made. Navigate to a record on the table you identified when first creating your BPF. If you don’t see the red bullseye graphic at the top of your screen, press the “Process” button on the main form command bar, select “Switch Process” and pick your BPF from the list.
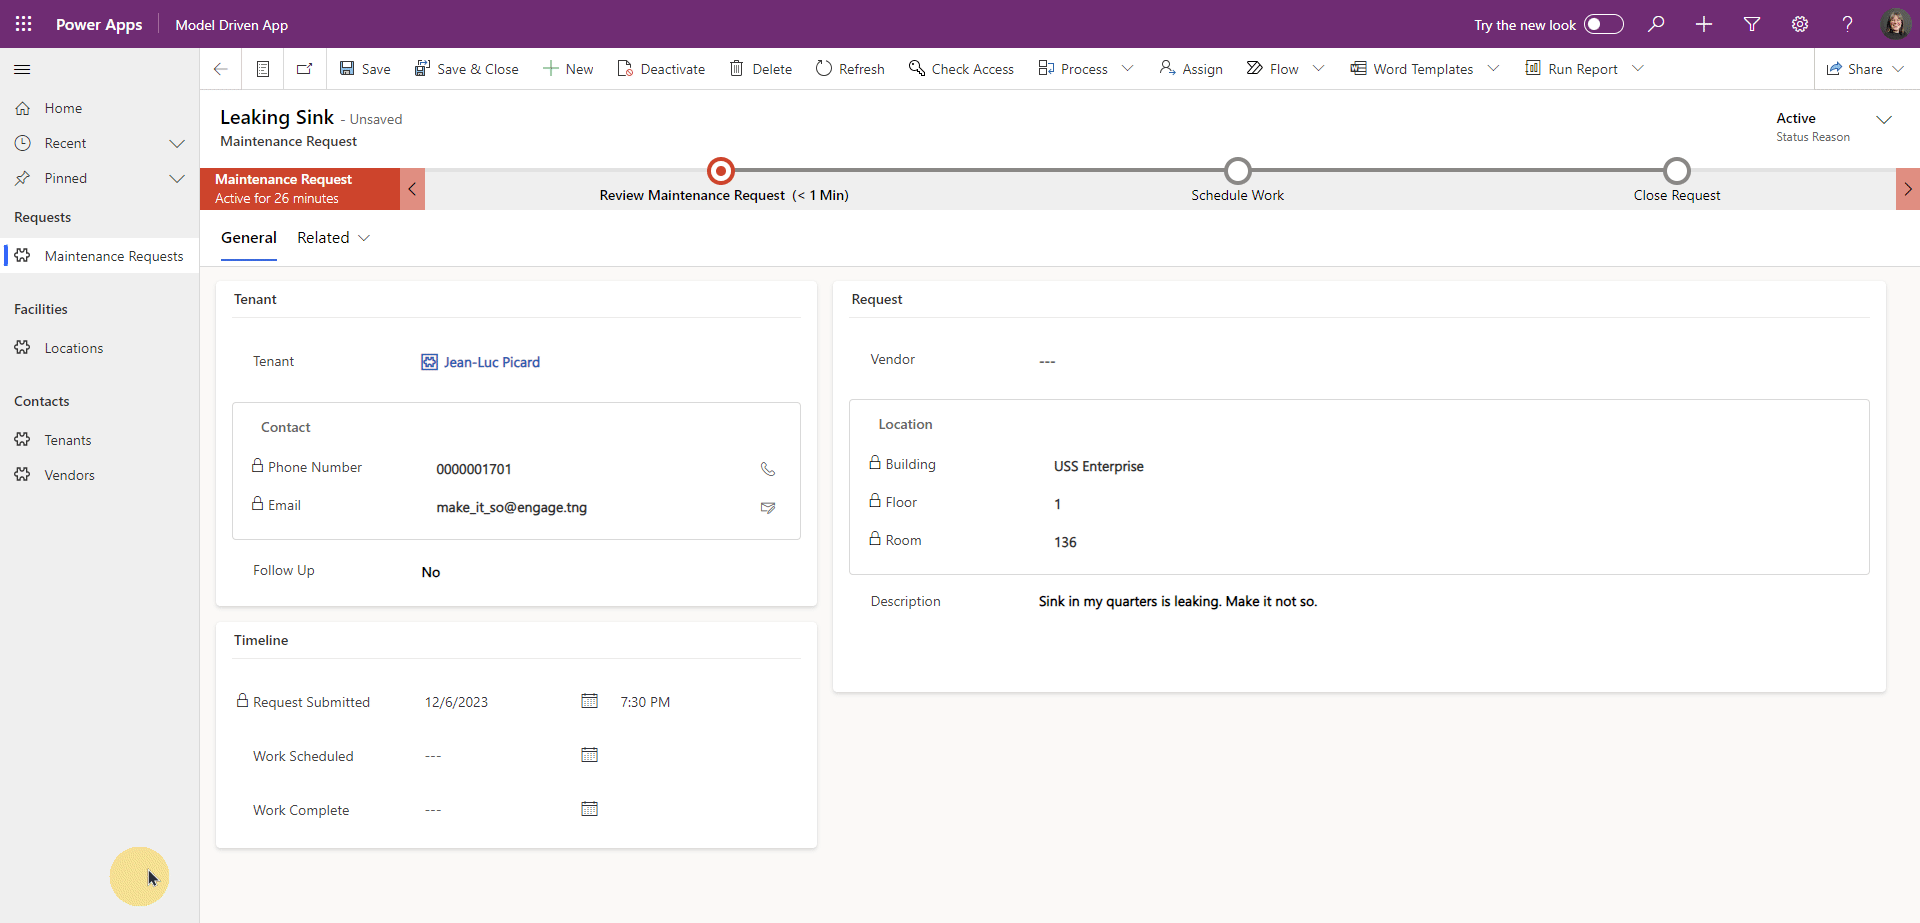
Now we have a clear view of where we are in the process of this maintenance request. To move the process forward, click the bullseye above the current stage; you then have the option to pop out the pane or to keep it small. You can see in my example that the fields on the main form are populated as I fill out the same fields on the business process flow pane.
Final Thoughts
Now that you’ve got a BPF in your app, play around and become familiar with the interface and the way it functions. Notice how it saves the record each time you advance to the next stage or how it captures the length of time a stage has been active. How could you leverage these features in other ways?
Though BPFs do have a few minor limitations, they are a powerful tool. For example, you can’t set views on lookups the same way you can on a main form, but that can be solved with some custom JavaScript! They’re much deeper than I’m able to show you in an intro article – they could even become the driving force behind your Model Driven Apps (and even Canvas Apps)!
.jpg)