.avif)


Standardize Data Across Your SharePoint Sites With Content Types

If you've wondered how people manage so much unique data and people on their SharePoint sites and want to make it easier for yourself? Let's dive into what benefit content types can provide for you and your users.
Intro
In today’s world, organizations have so much data to record and track that it can be overwhelming to organize. Luckily, SharePoint has the ability to create content types that can help us define what we want to track about our data. When we use content types, we’re able to standardize our content efficiently across the entire organization so you make sure you have the right metadata in the right place.
Want to learn how to build your first content type? You’re in luck.
What is a content type and how does it help?
If you aren’t familiar with the term metadata, it simply means data about data. Consider that a word document file your organization uses is a data file itself, but that word document likely has other data within it such as names, dates, numbers, categories, departments, etc.
Wouldn’t it be nice if you could pull some of that data and have it reside alongside your file in SharePoint? So many of these common data sets like historical records, memos, and forms are organized by this additional data. Content types allow you to call out what data matters to you and tag it on the file or item itself.
Not only can you add these properties to your data, but you can configure them in ways that force their use or at least encourage it. Making additional columns required on your content type means they need to be indicated by the creator when that content type is uploaded or created in SharePoint.
Some requests or tasks may be defined by a default status or an assigned user to address the item when they’re added to a list. When content is populated in these fields it greatly enhances the way that you can produce, view, and surface that content to both content owners and consumers in SharePoint.
Ultimately content types are all about you fully defining what your unique content should look like in your environment. They enable you to define your data, control how it is managed, and easily maintain a standard for it across your organization. Not every instance of data calls for a content type, but there are some common high-profile instances where it makes sense.
When Should You Create a Content Type?
A lot of benefits come from creating your own content types and people use them for a variety of different reasons. So, it can be a little difficult to determine if and when you should set one up. To help you understand, we’ve listed a few of the most common use cases that are no-brainers when it comes to realizing you should create a content type:
When you’ve defined a use case to create consistency across a site.
If you and/or your team are managing the same type of items or files across multiple lists and libraries and even across sites, then it would be helpful to create a standard content type around those things. Examples like company forms that indicate who owns the template, meeting minutes that need to include the date of the meeting, or users that get assigned to a request are generic content that you might find across multiple departments at a company.
When you have a specific template file for repeatable content that you’ll use in more than one area.
In many cases you may have something like a blank memo template, or an estimator prepared in an excel worksheet. While you can add these templates individually to libraries, if the same template is used across multiple libraries, then it makes you obligated to visit each of those libraries whenever that file needs to be updated. Configuring the file on a content type and adding that content type to any libraries means that you can push those updates out to all the libraries at once just by updating the content type!
When you have a workflow that you want to consistently occur in lists and libraries for certain content.
In the same way that columns and templates can adjoin with your content types around your environment, you can configure workflows to trigger automations when content types are created, modified, or deleted. When you know that creation or updates to certain content calls for an email alert, assignment or call to action, then a content type is in order.
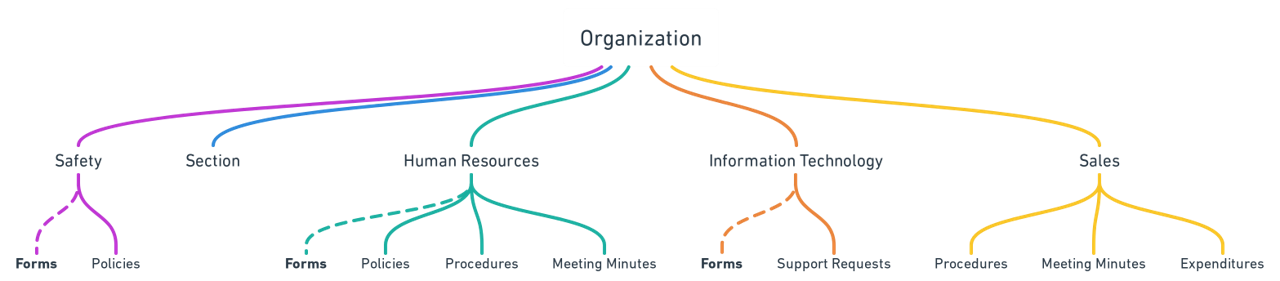
When you’re expanding your existing content types into more specific types.
Once you’ve created your first few content types and used them for a while, you may feel inspired to break them out into multiple child content types. For example, content type for general company requests may branch out into separate HR requests and IT requests since each of those departments may care about different properties on those content types.
We’ve spent plenty of time talking about reasons to create content types, but just as important is deciding where to establish these in SharePoint. Creating content types looks the same no matter where you do it, but where you pick impacts the accessibility of your content types and how easy it is to make more of them. Luckily, we’ll walk through all the options next.
Where should it be Created?
Office 365 is hierarchical in nature, especially in SharePoint. There are a few levels within SharePoint that we can create and apply content types and there are pros and cons to which path you decide to take. We’ll start with the most limited option and work our way up.
In a List or Library
The lowest level in SharePoint that a content type can be created in is an individual list or library. By default, all lists and libraries create out-of-the-box manage items or document content types event if they aren’t displayed in the list settings.
Once a site owner goes into the advanced settings and enabled content types, the option to manage, add, and create content types becomes available. This is usually the first place that creating content types occurs because it’s also the place where content types are enabled to be used in SharePoint.
However, this method of building a content type to an individual area isn’t very useful in the long run. The content type is localized to the list or library and can’t be reused in other additional site areas. So, if a user has ownership of a library and wants to customize their content in it, this might be satisfactory if they don’t plan on using the content types outside of the library ever.
In a Site
Fortunately, content types can be setup at the site collection level by a site owner as well. Adding site columns and site content types in the site settings allows administrators to establish site-wide content types that can be added to any list or library contained in the site. This even works for sub sites created within the site collection as well.
For site owners that manage an organizational site or a team with many lists and libraries, creating a content type at the site level allows them to apply it anywhere across the site easily.
In the Content Type Hub
In some organizations it may make sense for you to make these content types available anywhere at any time no matter what SharePoint sites come along in the foreseeable future. As it turns out, an additional site collection called the Content Type Hub is created within every SharePoint tenant environment.
Content types that are created here are published out and synced to all site collections in the entire tenant. Users need access to the content type hub to do this, so for organizations that have a designated user or team to standardize content types across the whole environment then this is a great option.

Now that we know what content types are and where to create them. Let’s go through the basics of setting one up for documents in a document library.

SELF ASSESSMENT
Is your business getting full value from your M365 subscription?
Billions of dollars are wasted each year on underused subscriptions. Take 3 minutes to find out where your tools are driving results, and where they’re holding you back.
Find Out Now
Is Team Communication Holding You Back?
Find Out in Just 2 Minutes.
Take our quick scorecard to uncover communication gaps and hidden barriers within your team.
Setting Up Your First Content Type
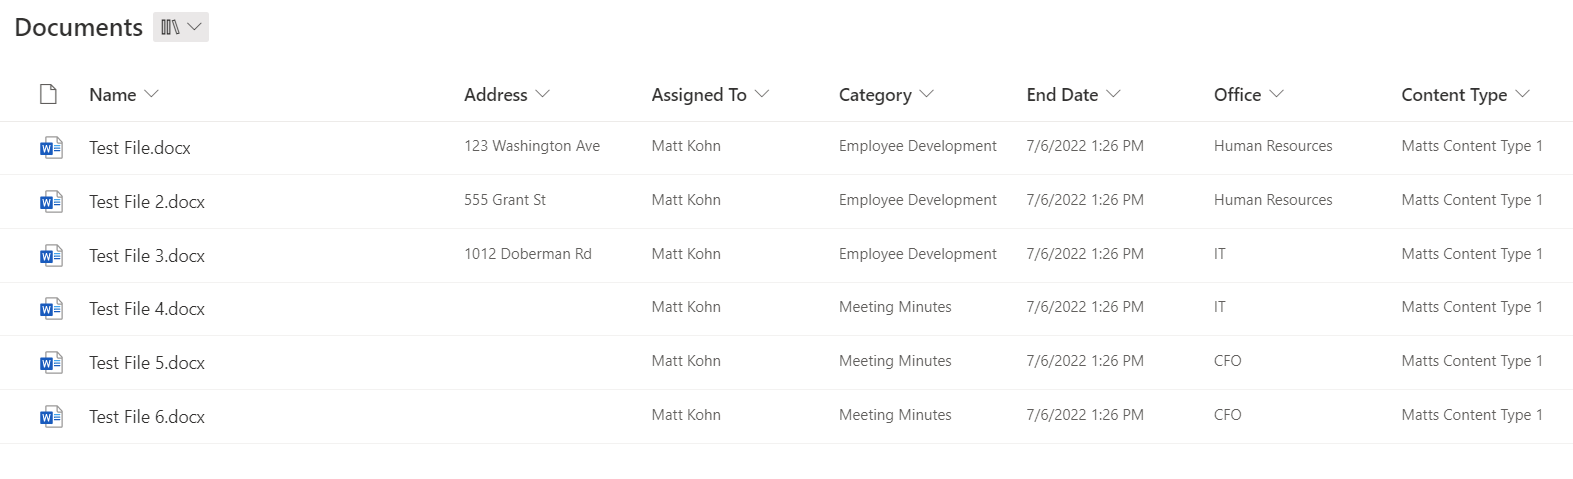
Let's say we have monthly meetings at an organization, and we’re required to track and sort these documents by the date of the meeting, who the meeting leader was, and whether it was a special quarterly meeting out of the year.
We can accomplish all these things by creating site columns as the basic building blocks for the content type and enable it across multiple department libraries so that any meeting organizers can open the same meeting template, add their notes, fill out the required tracking columns, and save it to their library.
Getting to Columns and Content Types in Settings
Let’s assume you don’t have rights to your organization content type hub, but you manage your own site collection so you can get into your site settings as a site owner.
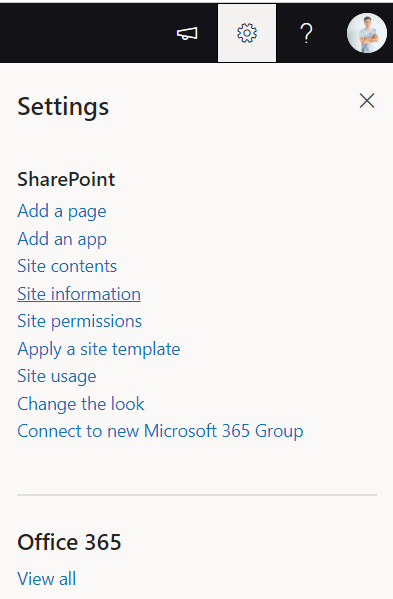
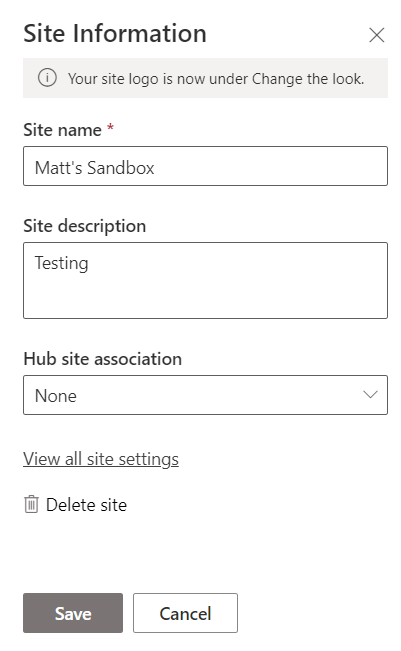
From any page in your site, you can click the Office 365 settings gear icon in the top right and select `Site Information` > `View All Site Settings`.
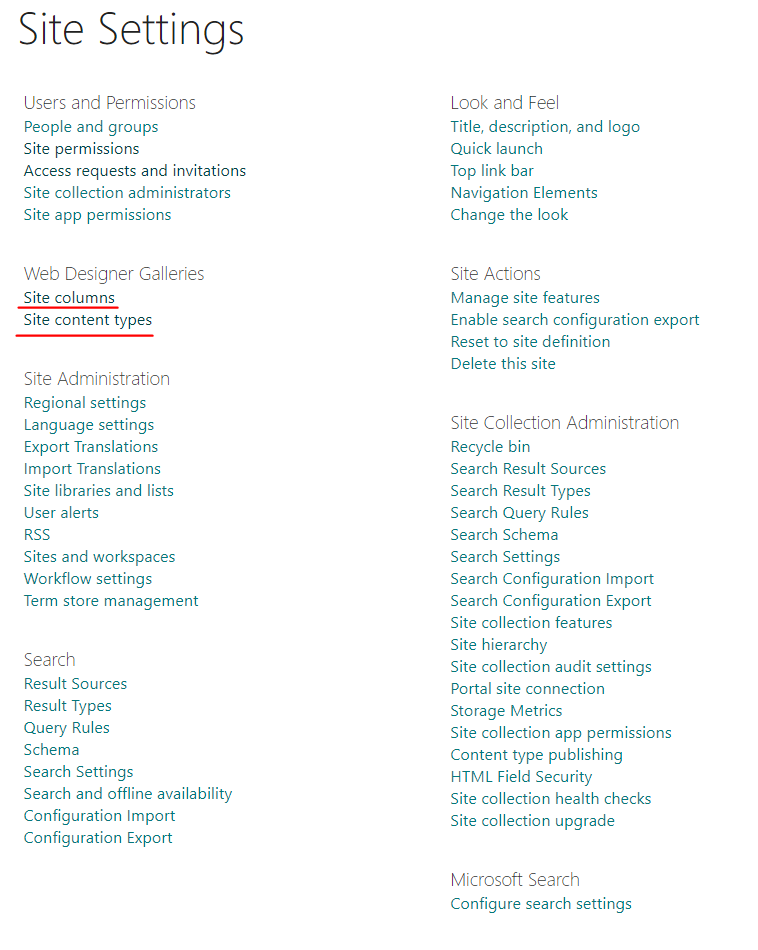
From the site settings page you can see links to add site columns and site content types under the web designer galleries section. I personally like to begin by creating all the site columns that I need for my content type first.
Adding Site Columns
Clicking the site columns link in site settings will bring you to all the existing columns in the site collection with the option to create one at the top left of the list.
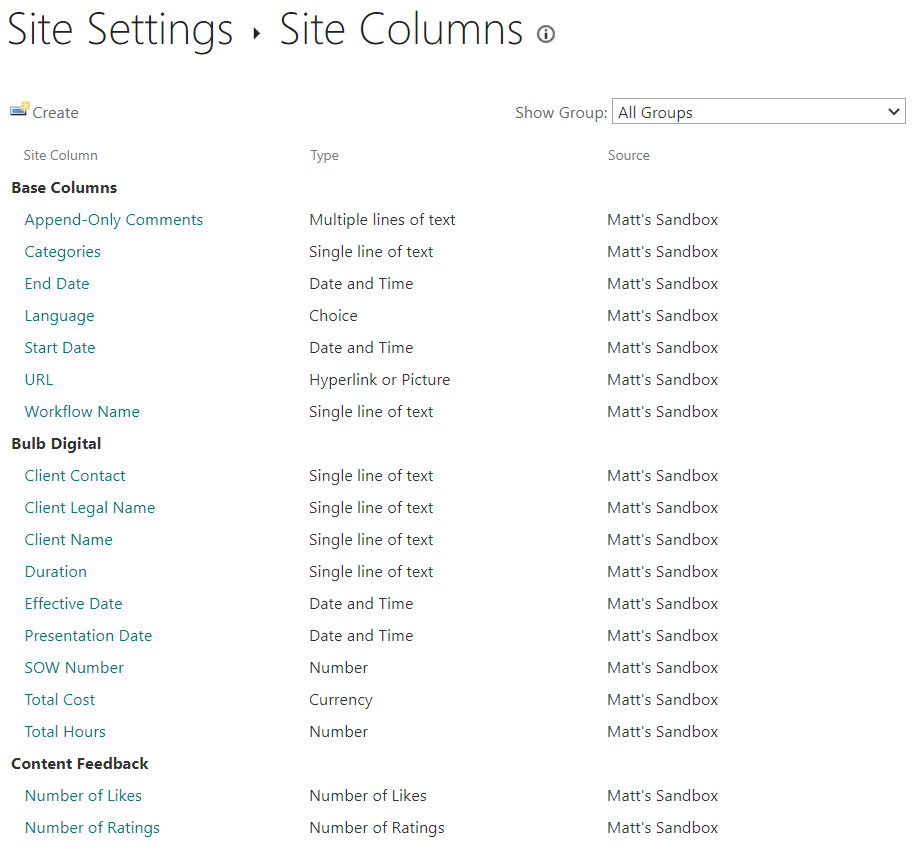
At the minimum you need to indicate the column title, type, and group the column belongs to. I recommend grouping them under a unique group of your choice so they’re easier to get to. If you’re unsure of what columns you need for your content type, it’s good to review with your team how you access your data.

What fields do users look for or how do they personally organize their files? Native columns also exist in SharePoint already and looking over these may spark an idea or two about how to define your content further.
In the scenario for this blog, you want to create a site column called Meeting Date and make it a Date and Time column type so we can record when the meeting minutes were taken for each meeting.
You’ll also create a site column called Meeting Leader and make it a Person or Group column type. Then you’ll be able to use a people picker to callout who in your organization led each meeting.
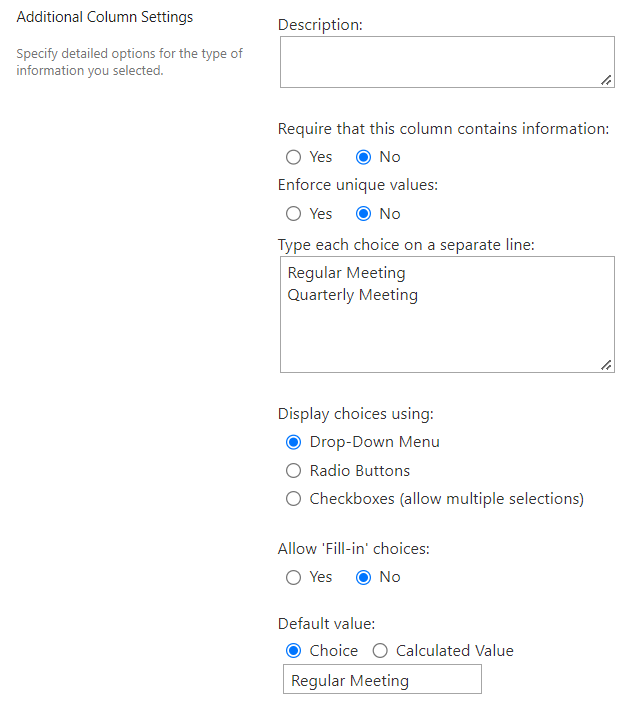
Finally, create a site column for Meeting Category and make it a Choice field. Scroll down to additional column settings and Regular Meeting and Quarterly Meeting as options for the column so you can establish what type of meeting it was.
Adding Site Content Types
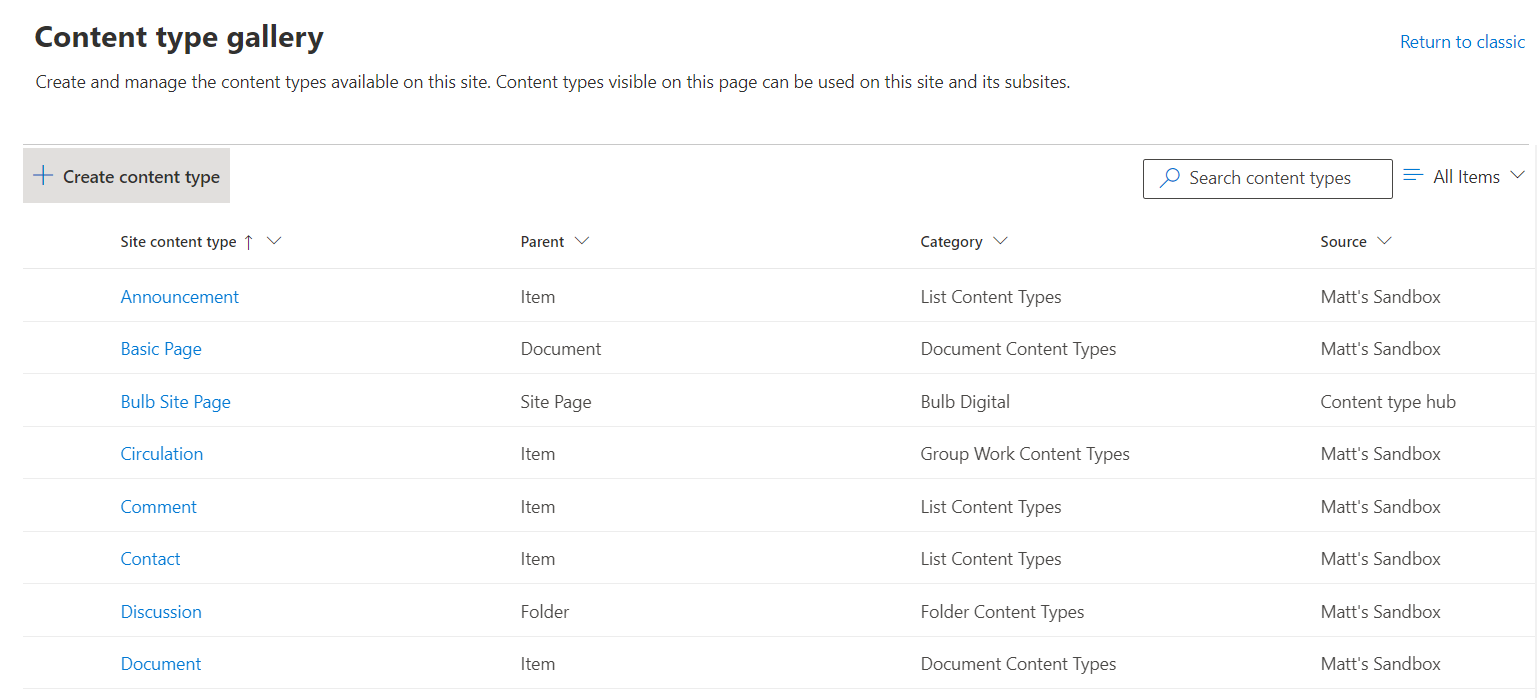
Once we’ve created the site columns, it’s time to create the actual content type. Picking the site content types link in site settings brings you to the content type gallery where all the content types available in your site collection are displayed. Then click create content type in the top of the list just like you did with site columns.
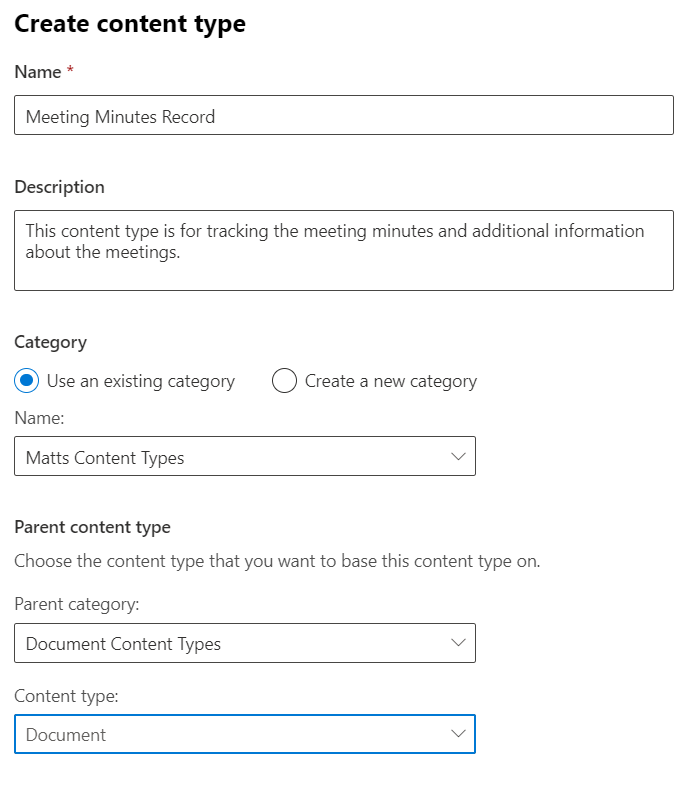
On the form for a new content type, you want to enter a short but clear name because it will be displayed as an option on drop-downs for libraries that it’s enabled on. A description field is optional, but useful if you plan on managing lots of content types that have similar names.
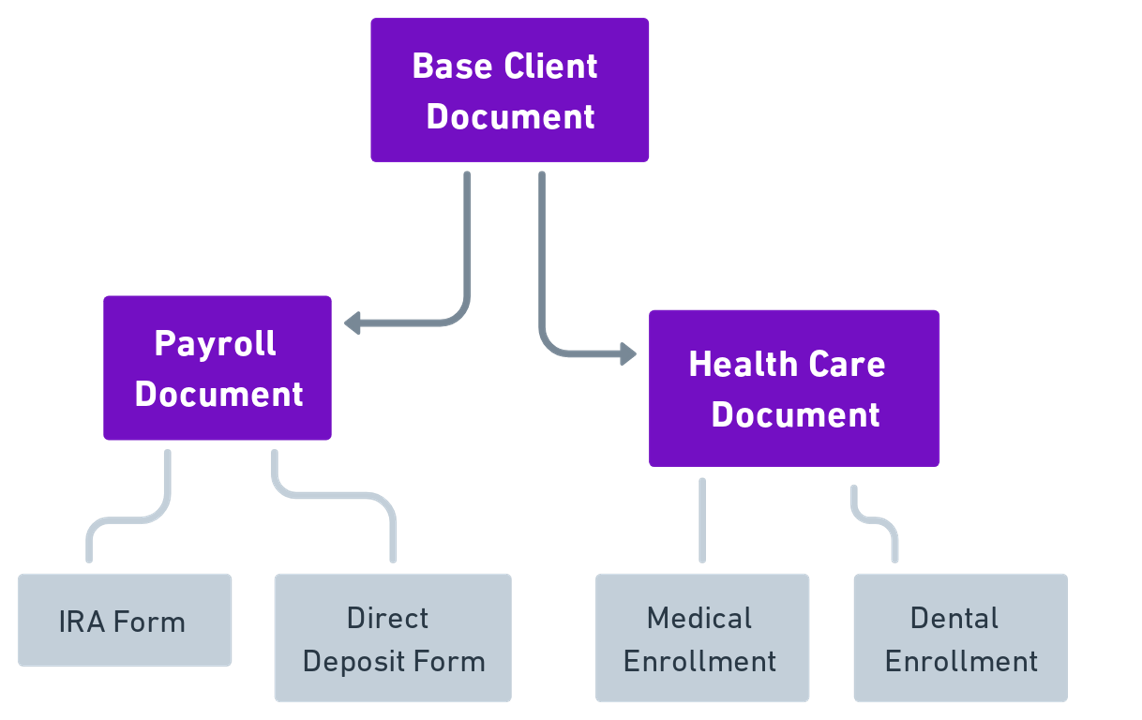
Just like site columns, you should create a new category to keep your custom content types separate from the native SharePoint ones. In this case, you're creating a content type for a file or document, so it should be created as a document content type (parent category) under the default Document content type. This means that the content type will inherit and start off with the properties of a default document content type in SharePoint.
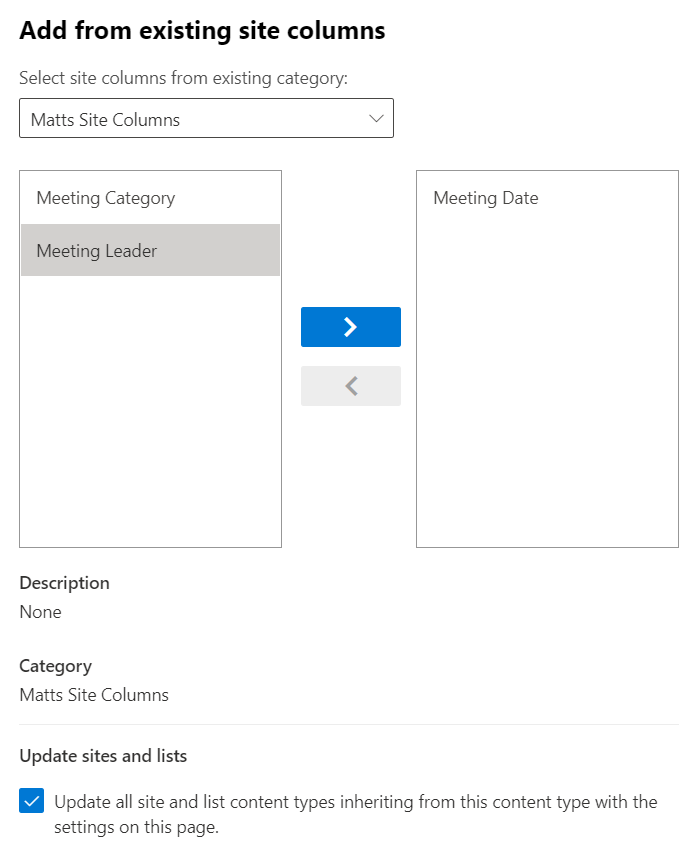
Adding to your Content Type
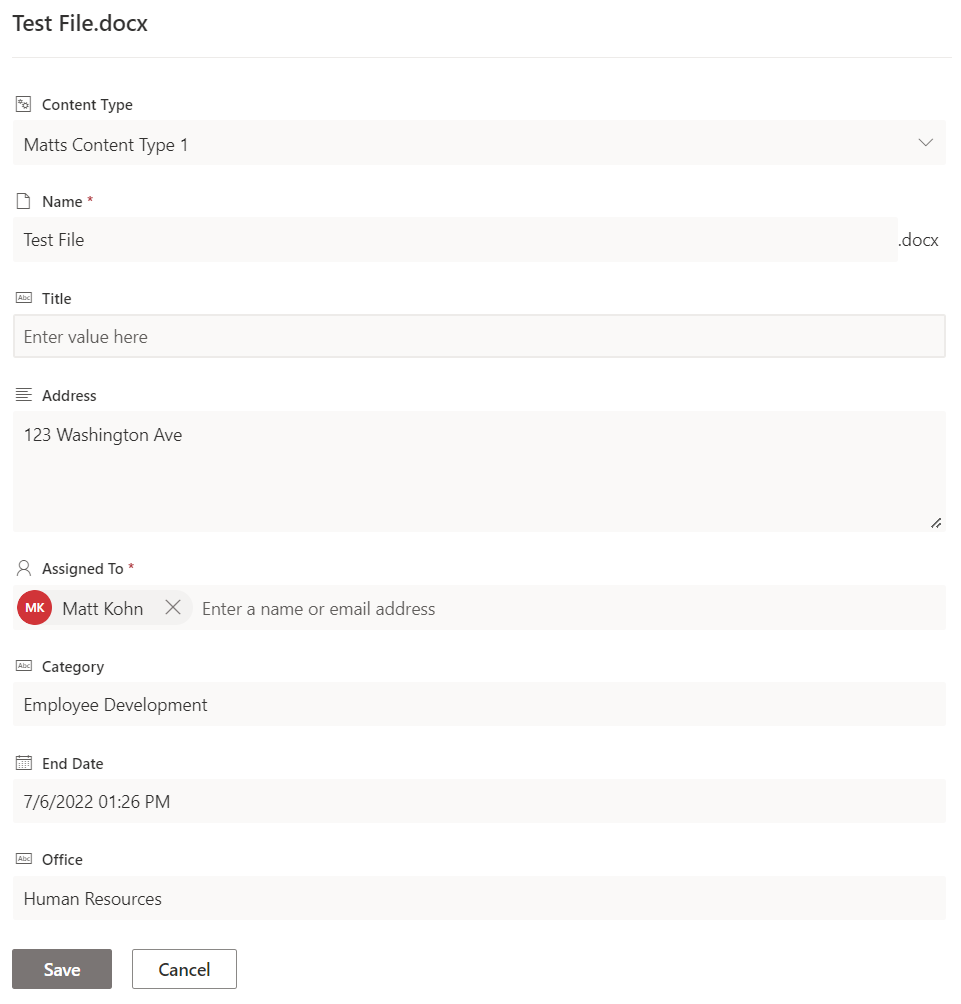
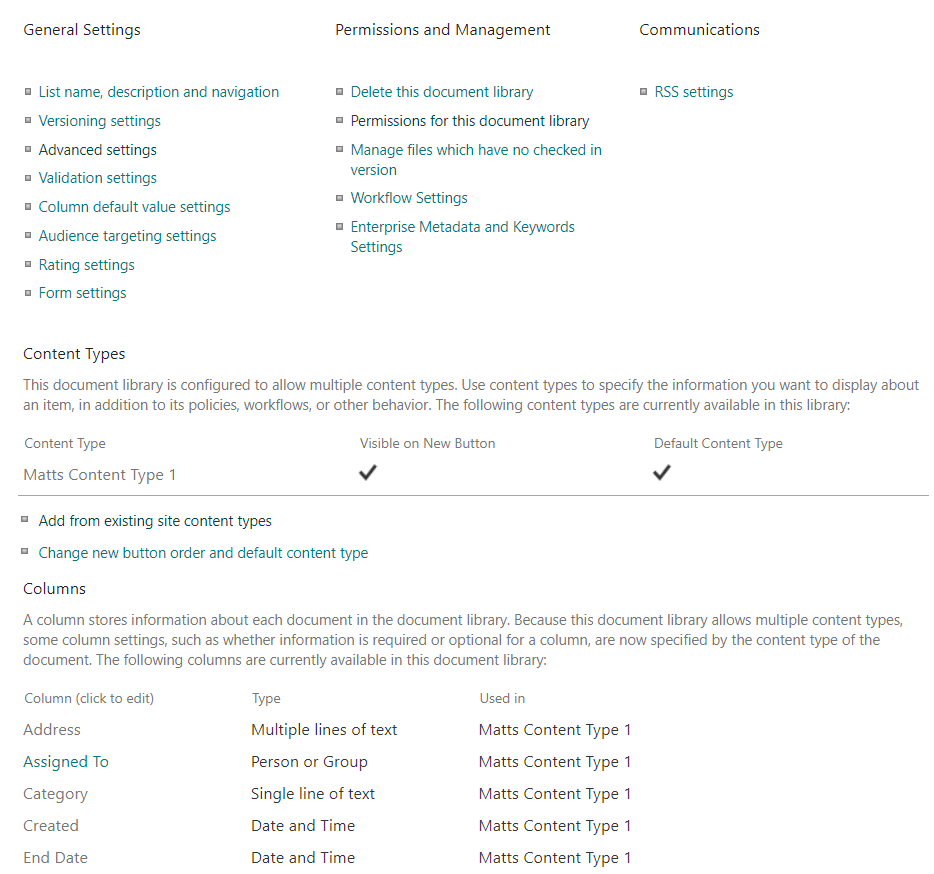
Once you’ve created your content type, you can find it in the gallery, click it, and add the additional site columns that you created in the first step. You’ll see some columns already listed depending on what parent content type you created it from, but a high level one like this simply has the Name and Title columns. After you’ve added more site columns you can drag them around and order them the way you like.
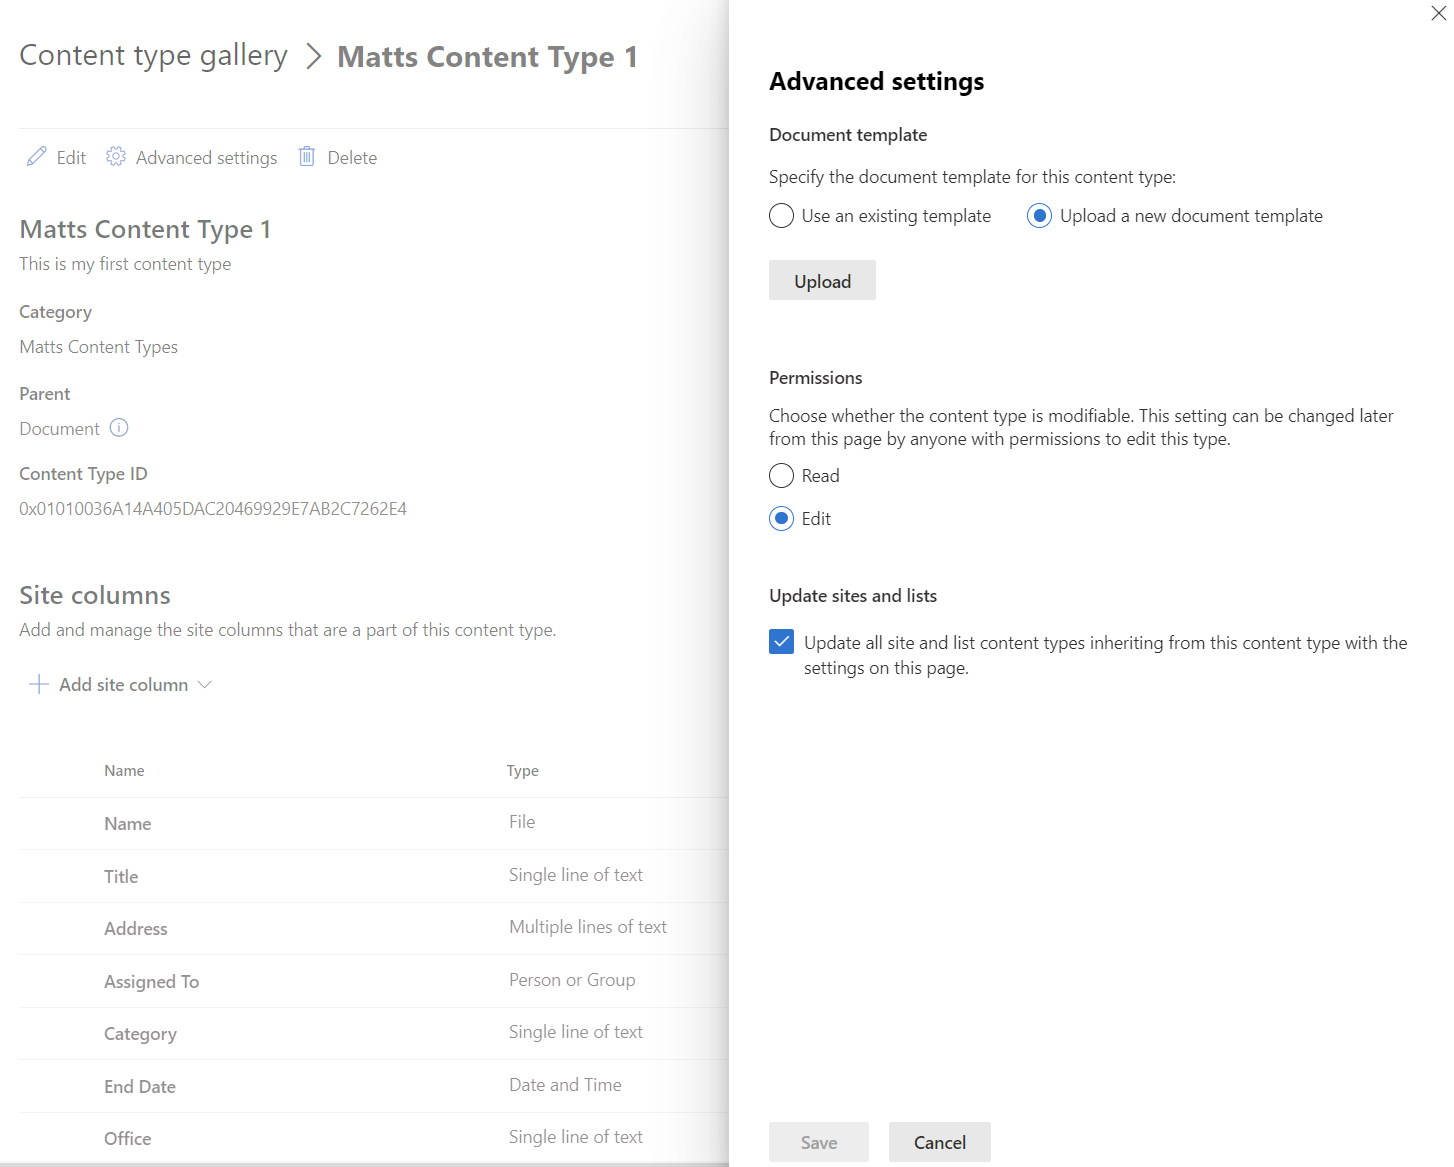
Click the edit button if you need to update the name, description or category. The settings dropdown allows you to manage policy settings for the content type or even click advanced settings in order to upload or link to a document template. This will configure the same document file to be used whenever the content type is created across SharePoint. I prefer to manage my templates right on the content type itself so that I know to go to the same place in SharePoint whenever I need to manage them. By default, this content type is configured to update on all sites and lists whenever I make changes in this one location.
Scaling Up
Now that you have your first content type setup, you can take the principles we’ve covered in this blog and apply it to other forms of data that you want to standardize in your organization. You know what goes into defining them, where to create them, and when to use them.
Like most other things in SharePoint, content types can be updated over time as you learn more about how your data can be used in the environment. We recommend starting slow and perfecting your first content type, then seeing how it’s utilized before moving on to tackling other forms of data in your organization.
Supplemental Links
Microsoft: List and library column types and options
Microsoft: Introduction to managed metadata in SharePoint
Microsoft: Publish a content type from a content publishing hub
.jpg)