How to Auto-Increment Document Reference Numbers with Power Automate

Use Power Automate to auto-increment your SharePoint lists and libraries for the next file or request you need recorded!
Intro
SharePoint lists and libraries are excellent resources for managing and aggregating an abundance of resources within the same container. In libraries, your files can take the form of policies and procedures, whereas lists are commonplace for dynamic things like request submissions or projects.
While SharePoint maintains great retention of data via version history, you may feel the need to add additional metadata on your items like specific date occurrences, delegates of responsibility, or in particular: a simple but unique reference number to give your content a searchable “barcode” string.
In this piece, we cover how to integrate Power Automation with your SharePoint lists and libraries to not only apply a unique reference number but also auto-increment that number in anticipation of the next file or request that needs it recorded.
Do You Really Need a Reference Number?
Let’s first answer why this could be a good implementation for users:
- Leveraging and integrating other applications within your O365 license is a huge win because it keeps all of your management and data in-house.
- This also creates a feedback loop from both users and managers of the implementation that you can work to improve together as a team.
- Setting up your system yields ownership and validation of the project effort and pays back the benefits in dividends.
The Gut Check: When a client asks how to implement a reference numbering system in SharePoint, I don’t automatically assume that they need one especially if they haven’t managed much-existing data in that environment. I prefer to challenge the client (or have the client challenge their users) to populate content in the library they manage their content and conduct various searches to try and get that data to surface to their users.
SharePoint has a historically refined search functionality and it’s only getting much better in modern SP. Previously a SharePoint search would compare a keyword string in the search box with string characters in any SharePoint column in the library. The most commonly checked columns were the default Title, Filename, Author, Created Date, and virtually any other metadata added to the content in SharePoint.
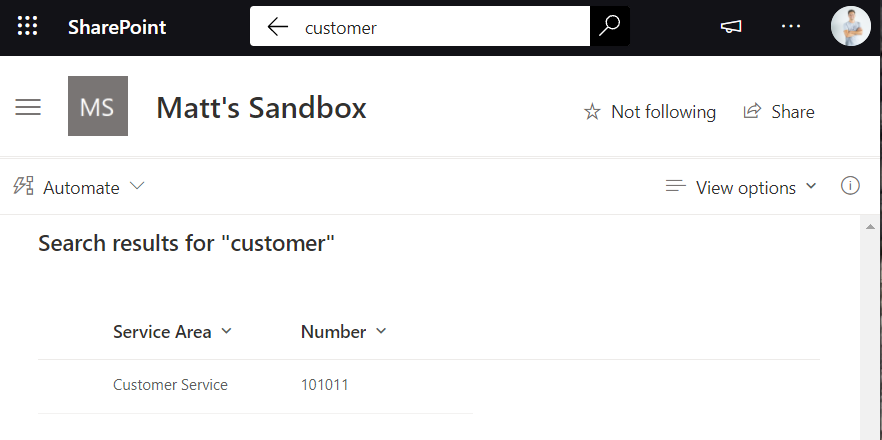
Now SharePoint scrubs the HTML within your file and can roll up balanced search results based on the number of hits, or even other ranking factors depending on how you choose and customize the search index in your SharePoint tenant. All this is to say that many users think they need a reference number column to help with the search, but, likely, their users are not using that number to access the file.
* It’s important to consider the process of users updating and accessing these files or requests and determine if the cosmetic benefit is worth the effort to configure the Power Automation.
The Reference Number as a (type of) Column
Adding a dynamic number property to your files can be as simple as adding a column to the library. A few considerations below help frame why you may want to employ more than just a single-line number column:
- While numeric characters in a number column are searchable, you may want to elect to use the single text line field that enables you to store numeric characters and also allow you to concatenate other strings of text.
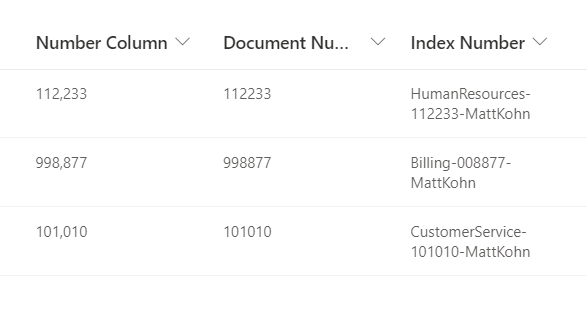
- Keep in mind that a single-line text field allows for up to 255 characters. A multi-line text field allows for a much longer string, but you’ll lose the ability to sort and filter by that column.
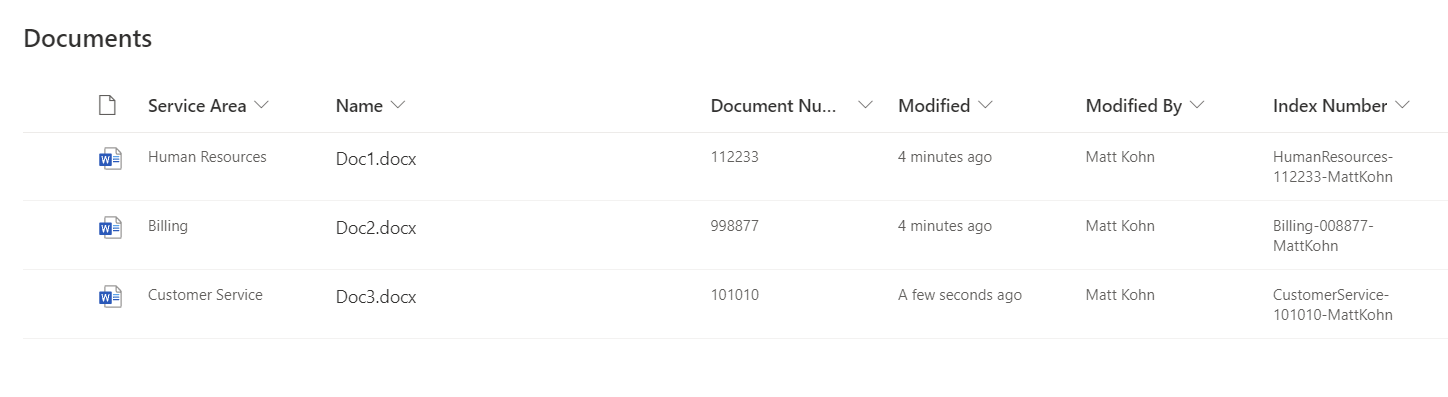
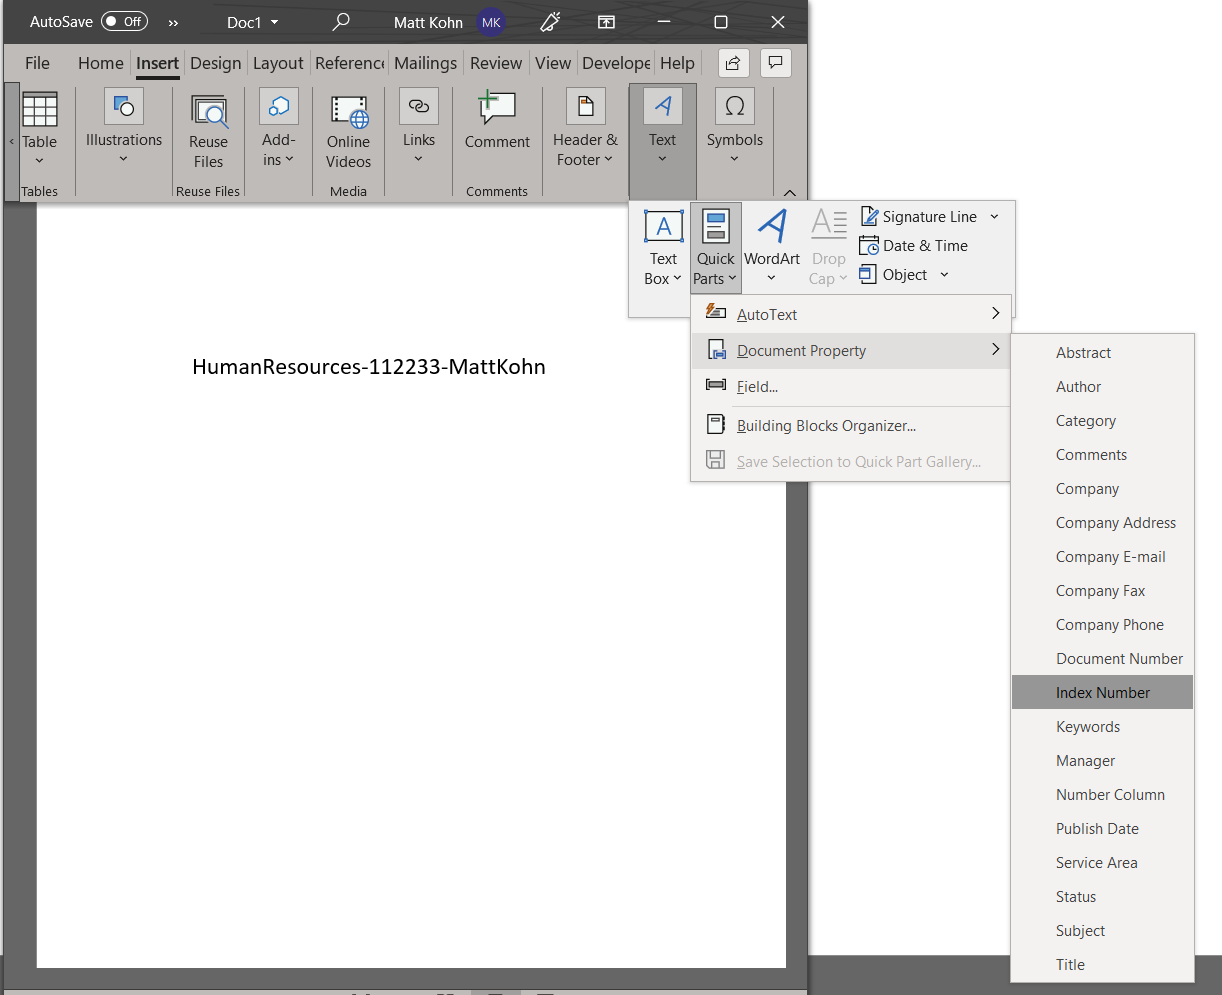
- Adding a Reference Number property column means that you have a field on each file or request when they’re uploaded to that SharePoint container. This metadata will incorporate in the actual file as a file property when downloaded, and also show up as a quick part field option to embed dynamically on the word document when opened in the Word desktop application.
Storing the Next Number
It can seem simple to “stamp” a number onto a file property column in a SharePoint library, but it’s a little more complex to consider how SharePoint can remember what number comes next in line. As strange as it sounds, we need to manage that uniquely incrementing number in its SharePoint List separate from those library files we’re stamping.
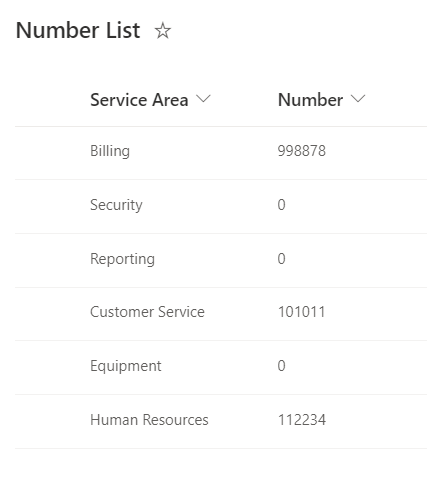
Creating an additional SharePoint list seems like extra work, but we need a repository for the Power Automation to continuously look at what number to stamp on a recently uploaded file, increment the number in the list that the number exists on, and then be ready to repeat on the next event.
Creating this “Number List” also enables us to monitor the incrementation in real-time via the automation flow and potentially allows us to add more than one type of reference number. Technically a number list could manage multiple number incrementation for several departments or service areas at a company.

SELF ASSESSMENT
Is your business getting full value from your M365 subscription?
Billions of dollars are wasted each year on underused subscriptions. Take 3 minutes to find out where your tools are driving results, and where they’re holding you back.
Find Out Now
Is Team Communication Holding You Back?
Find Out in Just 2 Minutes.
Take our quick scorecard to uncover communication gaps and hidden barriers within your team.
Building the Flow
After logging into your Office 365 environment. You can get to the Power Automation app from anywhere by selecting the waffle in the top left and choosing it. When you navigate to My Flows from the left-hand menu, you can create an automated cloud flow from the `+New Flow` dropdown in the top toolbar above the canvas.
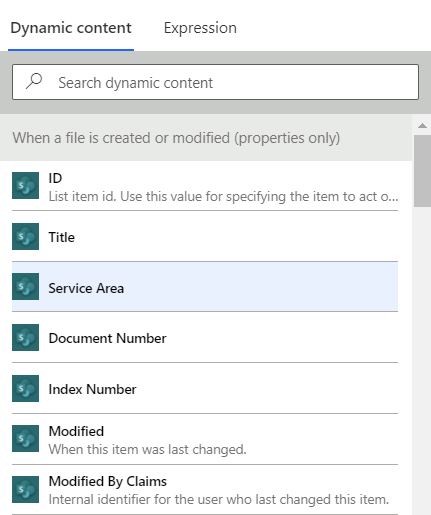
Depending on how many flows you intend on creating with your O365 account, a more descriptive title is useful. In this case, I searched for a flow trigger with `file created` as the keyword so I could pick when a file is created or modified (properties only).
After you’ve filled out the `Site Address` and `Library Name` the flow will trigger when an item is added to the library, whether it is created or uploaded:

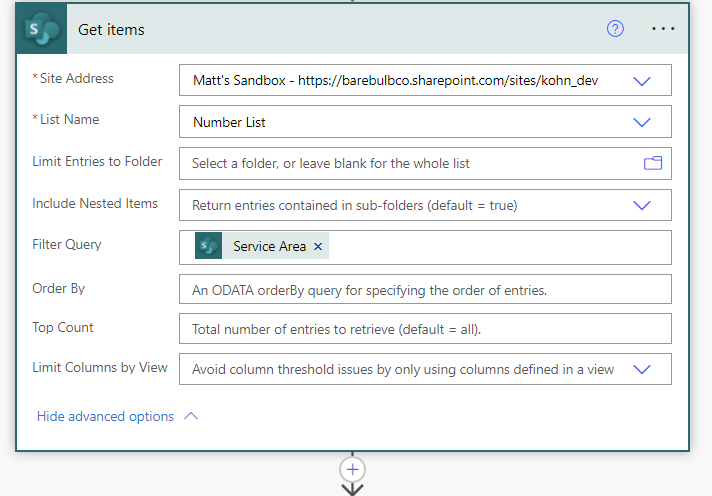
The next step `+New Step` below the trigger, is to get the data from the number list that holds the current numbers. In this case, the first trigger in the flow already pulled the data from the file that was added, so the flow knows the service area defined on the document. We search for a `Get Items` action and pick the SharePoint operation. After picking the `Number List` as the list name, we can dynamically filter the number to lookup in the list by the service area that came from the document:
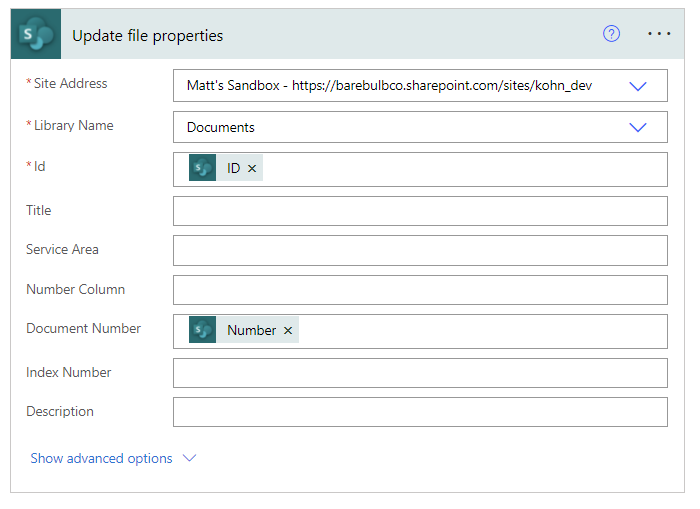
Now we take data that we have in Power Automate and edit the content with the `Update File Properties` step, another SharePoint operation. Be careful to choose the document `ID` property from the trigger step and the `Number` property from the `Get Items` step. This will ensure that the automation updates the document number column on the document with the number property from the number list:

You may notice that more than one property can be updated on the document. This is also not the only step that can be used to update files in SharePoint. Sending HTTP requests is another common way to post updates to data in Office365 environments in a similar fashion:
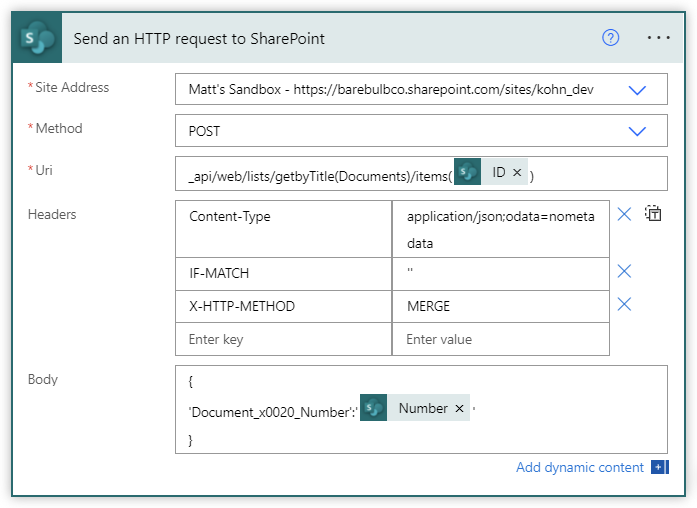
The final step is to increment the source number in the number list so that it is updated for the next document that triggers the automation. This is accomplished using a Compose data operation step and inputting the `syntax: add(outputs('Number'),1)`. The outcome of his composition becomes dynamic content that can be put back into another `Update Items` or `Send an HTTP Request` to update the actual number itself in the number list.
The Lifecycle (and Pitfalls) of Auto-incrementing Numbers
You’ll want to consider what it means to manage a continuously incrementing reference number in its list that has relevance to historically static numbers on your SharePoint list…
- What happens when a user accidentally uploads a document and deletes it? Is the reference number “skipped” for that momentary file?
- What if a user uploads a file that already has a reference number in their properties?
- If a user wants to update an existing file, how do they make updates without altering the reference number? Should the reference number be altered?
Play through these scenarios yourself and with colleagues to determine what your plan of action will be based on your preferences. What’s important is that you are in touch with the process and anticipate what your users will expect to happen. One outcome of these would be:
- When a user uploads a document with no number, it gets a reference number and when the document is deleted it is absent from the system.
- If a number already exists on a document (from a previously deleted one, perhaps) then configure the power automation to ignore overwriting it with the next reference number. No incrementation is needed here.
- For starters, I would assume that the reference number is static and remains unchanging throughout the lifecycle of the document. Any additional concatenations of metadata (department, modified date, current version) can and should be done with great consideration.
Wrap-up
Using Power Automation to dynamically assign metadata to content in SharePoint is a great challenge toward honing your Office 365 skills as a power user. It requires you to integrate between two applications within the MS suite and pull numerical data from a SharePoint list into Power Automate to copy it into content back in a list or library back in that environment.
Although I alluded to many other bells and whistles in this blog, I recommend setting up and populating the content in SharePoint first, both the number list and document library or request. Once you have the containers set up, creating the most basic form of automation and proof-testing will provide a great foundation for adding more components to it if you prefer.
Your management team will thank you for creating a sustainable system on-site that you’ll be familiar with and be poised to help troubleshoot if anything goes awry. Having the data in your O365 environments may encourage other users to utilize more and more of their suite applications and become power users themselves for other-like scenarios.
Key Notes
- Before tackling the implementation of a reference number; challenge your users to surface files via the SharePoint default search. In many cases, adding a keyword tag or classification column is all it takes to enable users to sort, filter, and find the content without a detailed reference “code” attached to it.
- Wanting a concise, unique number for each piece of content is justifiable, but it’s likely not the way that your users prefer to search and find those things.
- Utilizing power automation to concatenate another column with the reference number can help users visually discern the document's other files. For example, adding a department acronym before a hyphenated reference number might help orient users when accessing similar files from unique areas.
- Embedding a reference number onto your actual Word document file via a Quick Part can be useful for users that like to see the digital metadata linked to files in SharePoint align with the physical printout of the document.
- Outsourcing a random number generator to produce numbers or even 2D barcodes and implementing them on the actual file would still enable those characters to be picked up in default SharePoint searches.


.jpg)