Email With Options vs Built-In Approvals in Power Automate

Power Automate is a great tool to create prompts for a response from your users in a variety of ways. However, because it integrates with so many other apps in O365, deciding on the right action for a certain process can be unclear. As options continue to grow, knowing exactly how these actions operate and how they’re different will help you become a master of process flows for feedback.
Intro
When you have a business process that involves getting a response from a coworker quickly, it’s a hassle to draft up an email and manually send it over every time. Fortunately, Power Automate can help you automate these processes. There are a few different ways to get the job done, so let's walk through the different options you could use, and when to choose one over the other so you can start automating your day and not have to manage the process manually anymore.
Breaking Down Your Need for a Response
Before we dive into Power Automate, you should take some time to think about what kind of response you need back from your users.
Are you seeking a yes/no approval from an employee about a document update?
Or are there other calls to action that they could communicate back to you?
Perhaps the users are providing their own freeform response in whatever way they see fit.
Answering these questions early on can help determine what type of automation you should build.

You should also consider who is involved in this process, how you communicate with them, and how often. Sometimes the requests involve different people or can even involve multiple people.
How frequently will this be triggered?
Should a user be able to reassign the request to someone else?
Now that we’ve gathered some context around what needs to be involved with defining the request, let’s look at the more basic of the two ways to automate your request process.
Send Email with Options
An email is still a great tool for communication, especially when you don’t have to do it yourself. The "Send email with options" step in Power Automate works great for:
- When you need a simple response recorded somewhere.
- When you want to create your own custom response options.
- When the response back is more important than who made it or when.
- When you want to minimize the management of the request.
- When you expect immediate responses, requests won't be forgotten in inboxes.
Both actions discussed in this blog can begin with the same trigger. To make it simple, create a blank list in a SharePoint site and then create an automated cloud flow in Power Automate from the trigger "When an item is created". Once you’ve connected to your list, you can add the "Send email with options" step – in this case, I’ve set up a list for employees to submit company outing ideas and send them to a user to approve or deny.
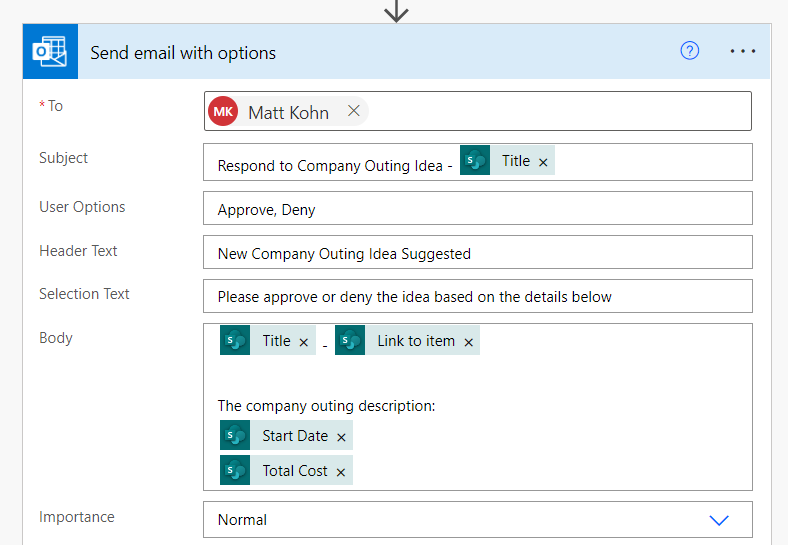
Sending an email with options in a flow is just like the default send email step, except it gives the recipient a selection of responses that you control in the User Options field. You can have as many options as you like, just remember that these are simply buttons on their email that can be used as dynamic data in later steps or other flows.
The beauty of incorporating this step comes from being able to customize the email subject, header, selection, and body fields with HTML. While many other services in this app have their own default displays, the email with options allows authors to embed additional information to guide their process flow. In my example information like the intended date, approximate cost, or even an external link to the venue can greatly expedite the decision-making process for an approver.
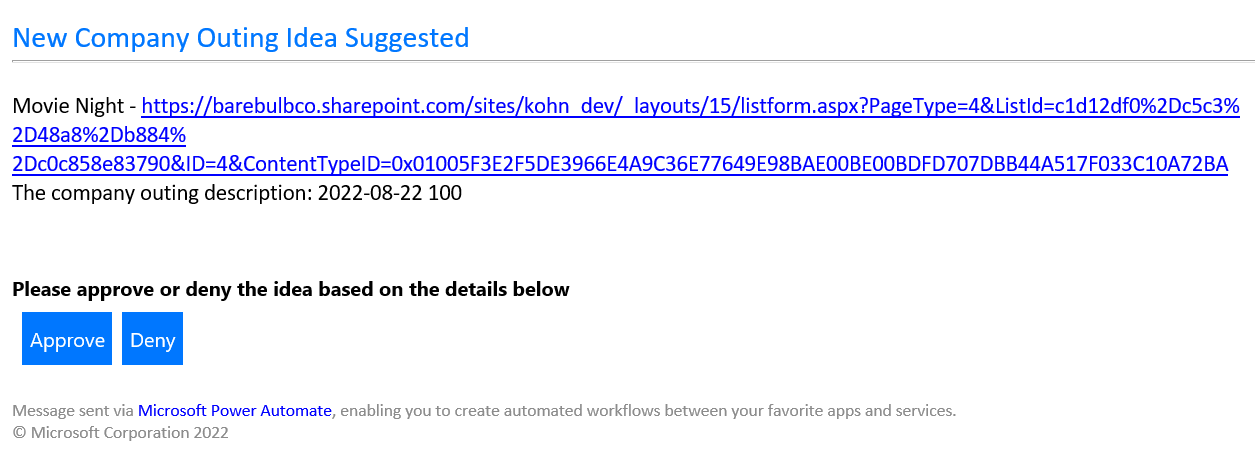
Once selected, the responder is sent a default thank-you message, but I’ve included one more step that creates a list item in another list for outing ideas that have been responded to. The flow is clever enough to stay running for up to 30 days waiting for a response from that email before creating a record of the response in my list.
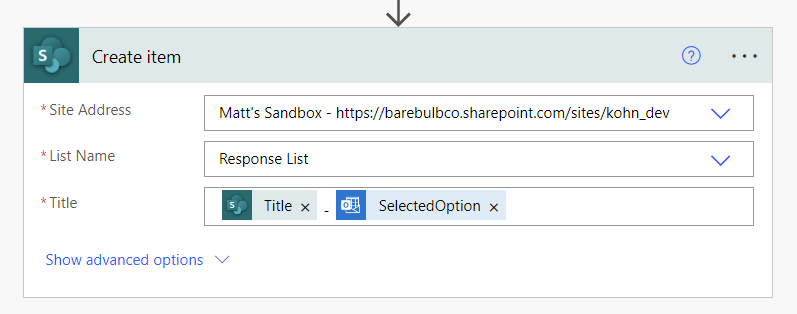
In more complex applications a condition can divert submissions and their responses into separate lists and additional properties from the original outing idea can be updated to those final lists of records using the Update item step. From there it’s simply a matter of determining what you want to do with the data or have more flows trigger from those lists.

SELF ASSESSMENT
Is your business getting full value from your M365 subscription?
Billions of dollars are wasted each year on underused subscriptions. Take 3 minutes to find out where your tools are driving results, and where they’re holding you back.
Find Out Now
Is Team Communication Holding You Back?
Find Out in Just 2 Minutes.
Take our quick scorecard to uncover communication gaps and hidden barriers within your team.
Built-In Approvals
The other method is Start and Wait for Approval. This beefed-up step comes in handy:
- When you want to track and monitor approvals that you’ve sent, completed, or been assigned.
- If your request needs to go to more than one person, or in a specific order.
- When responders want to include comments or reassign the request to someone else.
- If you trust users to manage their approval task assignments.
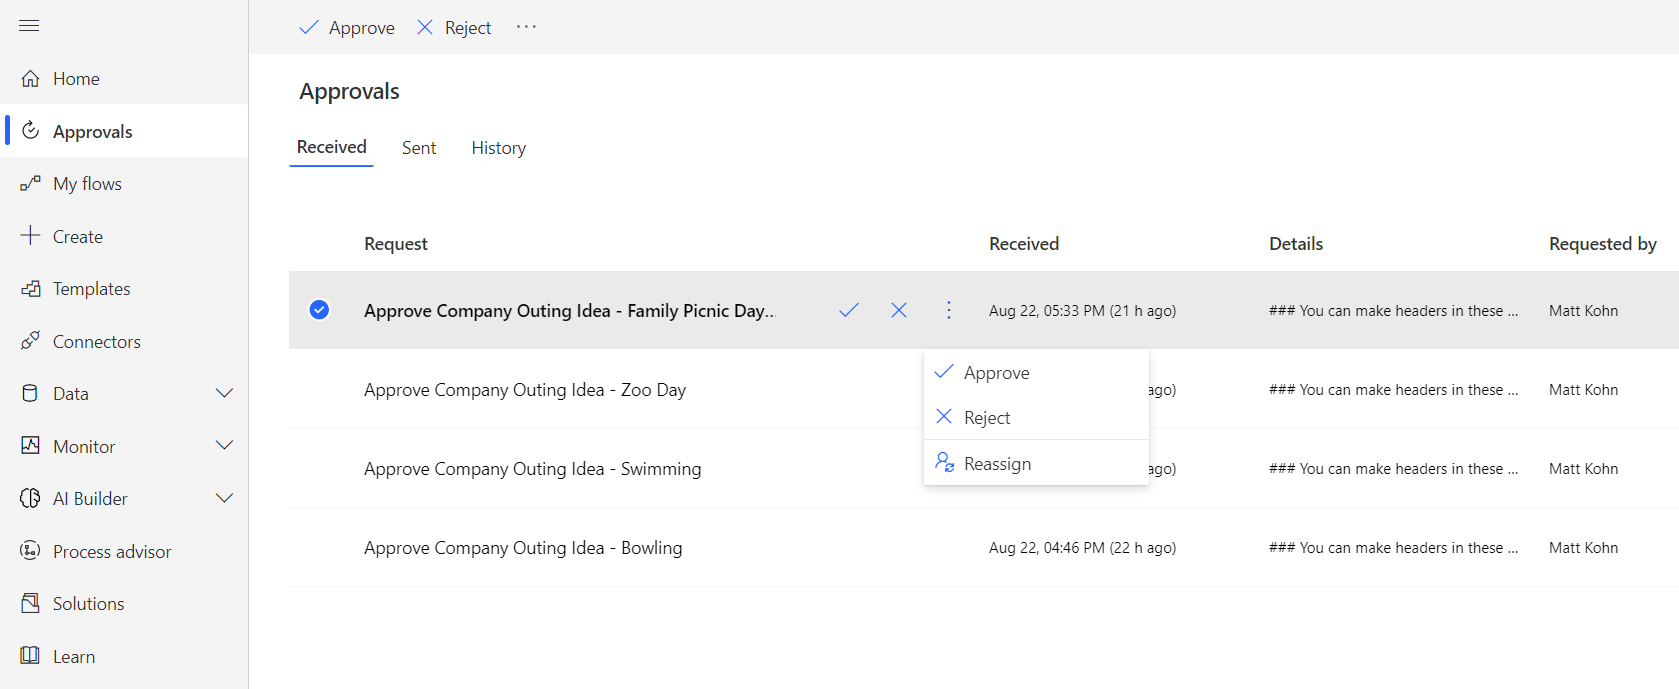
This action creates and assigns an approval request for the responder to act on, which they can access and monitor in the approvals section of Power Automate or the Approvals app in Teams.
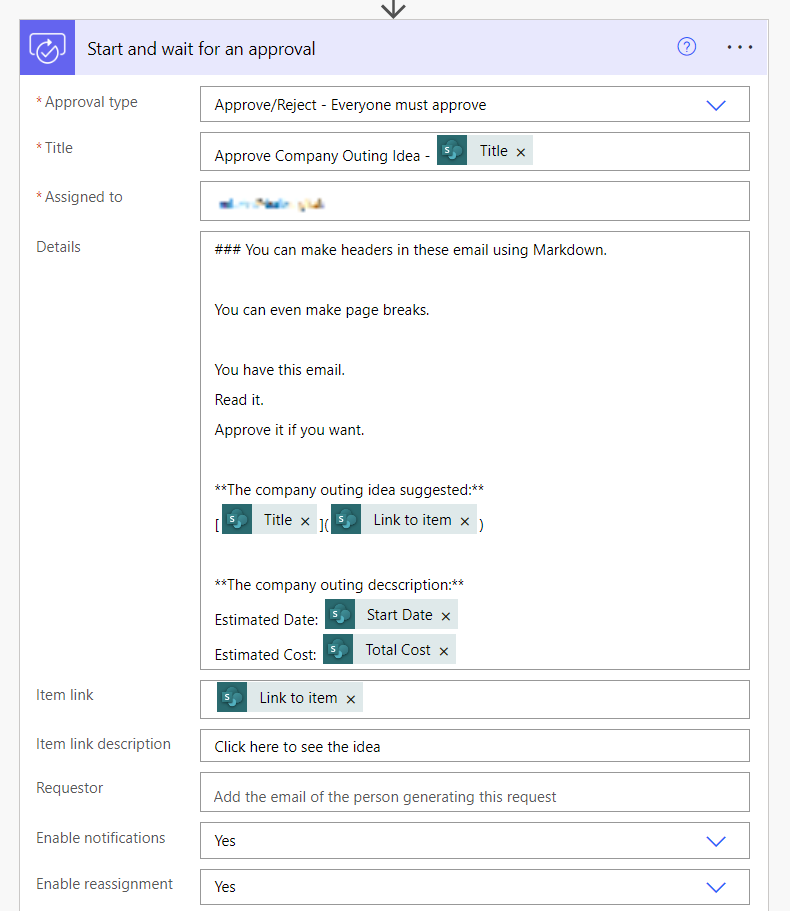
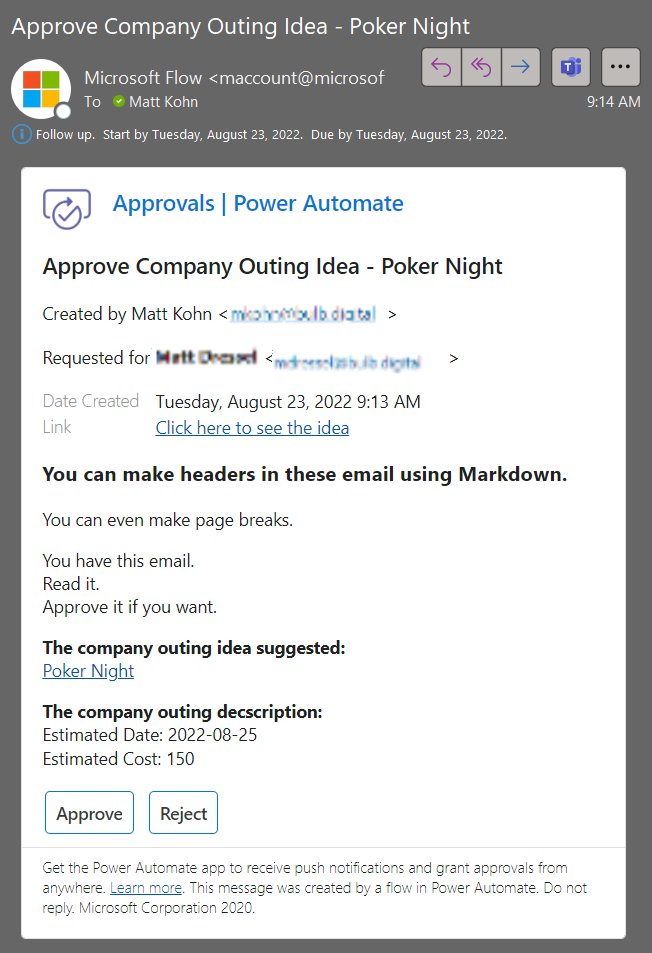
To set up an approval you can use the same trigger and list as before, then add the Start and wait for an approval step. The approval types range from simple approve/reject option for the first responder, wait for all responses if you configure put multiple assignees, and set up as many custom responses as needed. You can still get creative with the email body and indicate a specific requestor for approval, but the email is still sent by the Microsoft Flow account.
As mentioned, the approval email alert has much of the same content as the email with options but looks very different from the previous output. When the user selects a response, instead of being redirected to a thank you message, the email expands and offers a field to provide comments before either approving or rejecting the approval.
Remember this action creates an actual approval in Power Automate for the assignee that they can also get to from within that app or their Teams app if they add the approvals app to their sidebar. The Power Automate view is great if you’re monitoring approvals that you’ve sent others or your history of responses, while the Teams view is a friendly view of the same.
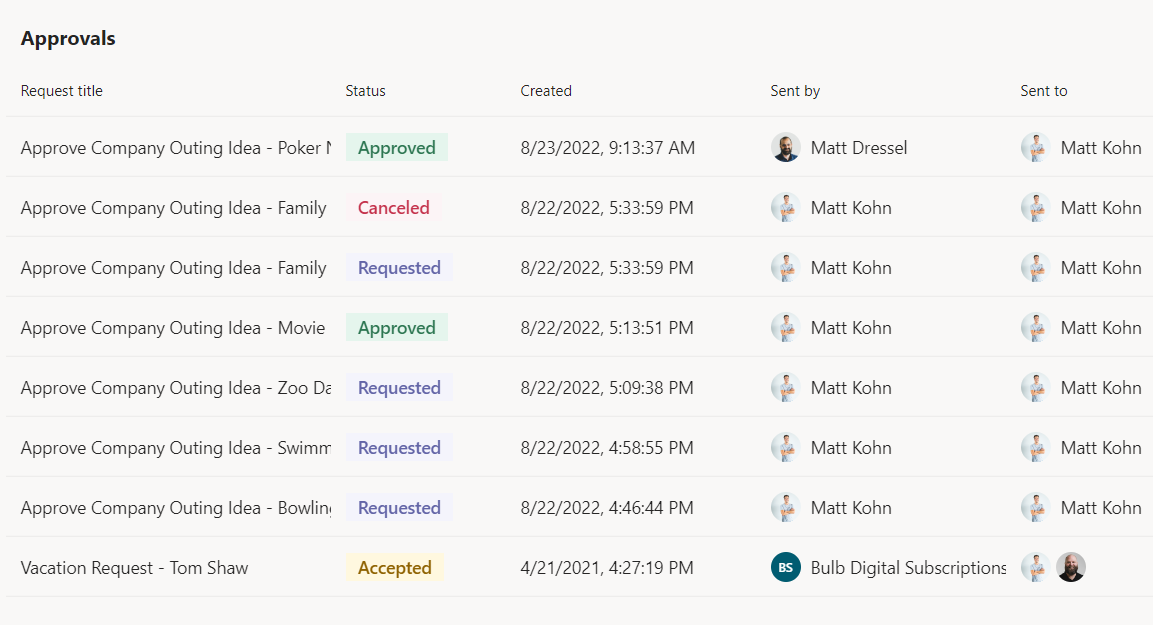
The biggest difference between the email responses and starting approvals in power automate is the management of actual approvals in the O365 environment. Approvals are a format of responding to a request, but it is usually applied to the validation of a reviewed document or process flow step. Configuring approvals with unique responses ultimately operates in the same fashion but lets the user respond in a more specific context aside from reassigning the approval or canceling the request.
Once the approval has been resolved that same response data can also be fed into a list using the same Create Item or Update Item steps in Power Automate. However, many users find that the approvals list built into the application already serves their tracking and monitoring needs.
How to Decide When to Use One Over the Other
You’ve seen ultimately the email alerts for both steps in this blog:
- Can be heavily customized with email content
- Allow the assignee to respond directly from their email.
- Indicate confirmation to the responder when they’ve taken action.
- Come from the flow service (or flow author).
Yet the steps differ in some key areas:
- Each email has a very different display style to the recipient in Outlook.
- The approval action offers a greater scope in managing the response than a simple email with choices.
- The user can only respond to the email with options from the one email sent to them.
- Approvals that aren't immediately addressed can always be found in the approvals app.
- The Send email with options step sends the request from you as the author of the flow.
- The Approval step uses the approval connection, sending the request from the flow account, and only adds the requestor to the email body if you put one in the optional field.
At the end picking one method over the other comes down to how much you want to configure, how much feedback you expect, and how closely you want to track these responses.
Conclusion
You can accomplish most of the goals in the blog with either of these methods in your automation. Both actions are robust in their customization when it comes to presenting a responder with a description or links to the item that they need to address. It’s when your user takes action that these two steps operate differently in the management of that response data.
Those who haven’t explored the approvals dashboard in Power Automate may be reluctant to incorporate the app into their flow builds, especially if all they need is a simple response. Sending an email with custom-tailored responses does enable novice users to get basic feedback from their team, but they still need to inject it into a list if they want to manage the data further. Once you’ve become comfortable with managing approvals, the advanced configuration to create custom responses on the Approvals action in Power Automate gets you even closer to having the best of both worlds.
Supplemental Links
Recording Send Email with Options Responses
Start with a Template - Send email with options when a new item is created in SharePoint list
Shared Approval Template Ideas


.jpg)