


Making the Most of Microsoft Teams Rooms: A Practical Guide

Tired of hybrid meetings that feel half-baked? Discover how Microsoft Teams Rooms can turn any space into a seamless collaboration hub in today's blog 💻
Intro
In today’s hybrid workplaces, companies invest heavily in digital tools—but meeting rooms often fall behind. If you handle IT strategy or just want your next hybrid meeting to go smoothly, this guide is for you.
Microsoft Teams already provides a strong platform for chat, video meetings, file sharing, and calls. But without Teams Rooms, physical meeting spaces can cause frustration, unreliable connections, mismatched devices, and wasted time.
Teams Rooms bridges that gap by combining Teams software with certified hardware. The benefits are clear:
- Consistency: The same Teams interface on every room console and screen.
- Ease of Use: Start or join meetings with one touch.
- Hybrid Ready: In-person and remote attendees share the same experience.
- Advanced Features: Always up-to-date with the latest Teams capabilities.
The result? Meeting spaces that work the way your people already do.
Why Teams Rooms Matter
Most organizations already use Microsoft Teams, but too few extend it into physical rooms. This leaves them with:
- Costly rooms that go unused
- Calls where people can’t connect easily
- Remote workers who feel left out
Teams Rooms solves these issues by making every meeting space a natural extension of Teams. No more searching for missing adapters, broken remotes, or whiteboards invisible to remote participants.
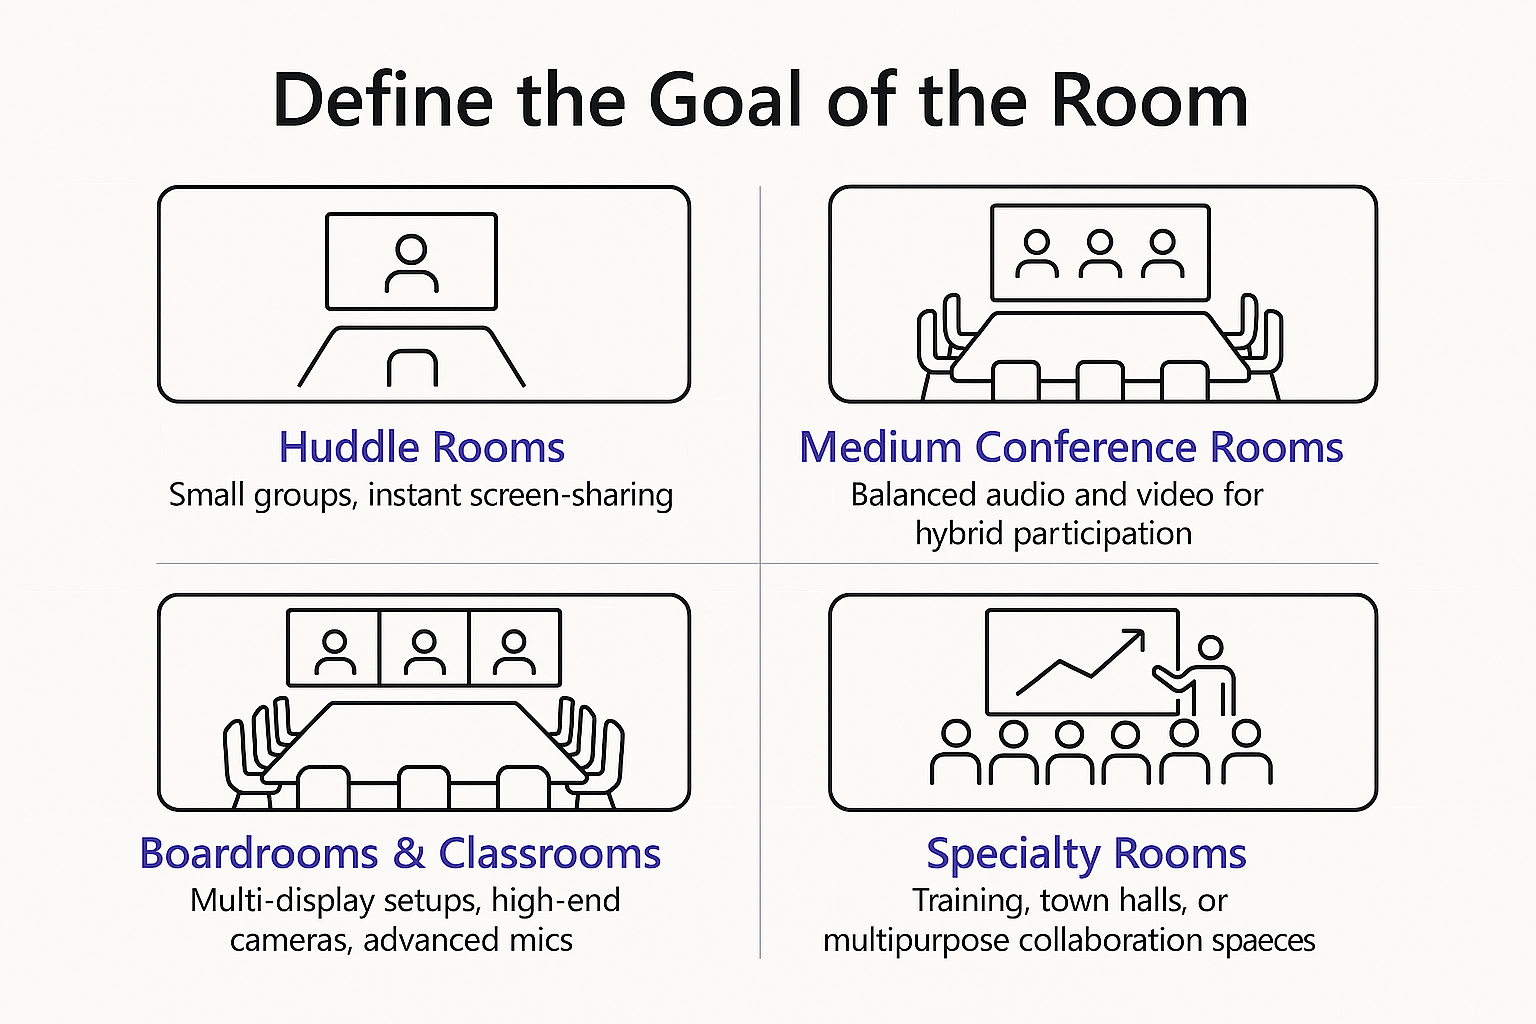
Step 1: Define the Purpose of Each Room
Not all meeting spaces serve the same function. Defining each room’s role helps you pick the right hardware:
- Huddle Rooms (2–4 people): Quick brainstorming or one-on-ones. Simple setups with all-in-one devices work best.
- Medium Rooms (5–8 people): Team meetings and client calls. Use quality cameras, clear audio, and dual screens for balance.
- Boardrooms & Large Rooms (10–20+ people): Executive or high-stakes meetings. Require advanced microphones, cameras, and displays for reliability.
- Specialty Rooms (training, classrooms, town halls): Flexible setups with modular equipment, interactive displays, or broadcast tools.
Matching technology to the room’s purpose prevents both overspending and under-investment.

Step 2: Licensing and Hardware – What You Need to Know
Before choosing cameras, microphones, and displays, it’s important to understand the licensing that powers Teams Rooms. Microsoft offers two options: Teams Rooms Basic and Teams Rooms Pro.
- Teams Rooms Basic (included with devices):
- Free for up to 25 rooms per tenant.
- Provides essential features like one-touch join, calendar integration, wireless content sharing, and automatic updates.
- Works well for smaller organizations or pilot projects with only a handful of rooms.
- Limited management—IT will mostly rely on built-in tools.
- Teams Rooms Pro (paid subscription per room, per month):
- Required if you plan to deploy more than 25 rooms.
- Includes advanced management through the Teams Admin Center with proactive monitoring, remote updates, and troubleshooting.
- Unlocks premium features such as Front Row layouts, intelligent audio/video (AI-driven framing, speaker tracking), and third-party meeting support (Zoom, Webex) via Direct Guest Join.
- Offers access to Teams Rooms Pro Management for analytics on room health, usage, and adoption.
Choosing the Right License:
- If you’re testing Teams Rooms or outfitting a few small spaces, Basic may be all you need.
- If you’re scaling across multiple sites, want advanced features, or need guaranteed uptime, Pro is the better investment.

Hardware: Cameras, Audio, Displays, and Consoles
Once you’ve selected the right license, it’s time to choose the hardware that brings your Teams Rooms to life:
- Cameras: Wide-angle lenses for huddle rooms; auto-framing or tracking cameras for medium rooms; PTZ or multi-camera systems for large rooms.
- Audio: All-in-one devices for small spaces; daisy-chained mics and dedicated speakers for medium/large rooms.
- Displays: Single screens for smaller rooms, dual displays for hybrid meetings, or projectors for very large spaces.
- Consoles & Controllers: Touch panels like Logitech Tap or Yealink consoles give users easy access to meeting controls.
Always stick with Teams-certified hardware to avoid compatibility issues and ensure reliable performance.


SELF ASSESSMENT
Is your business getting full value from your M365 subscription?
Billions of dollars are wasted each year on underused subscriptions. Take 3 minutes to find out where your tools are driving results, and where they’re holding you back.
Find Out Now
Is Team Communication Holding You Back?
Find Out in Just 2 Minutes.
Take our quick scorecard to uncover communication gaps and hidden barriers within your team.
Step 3: Unlock the Teams Rooms Software
The software is what makes the system powerful:
- One-Touch Join: Meetings start instantly—no codes or dial-ins.
- Proximity Join & Casting: Connect and share from your own device without cables.
- Whiteboard Integration: Use digital whiteboards or cameras that share physical whiteboards with remote participants.
- Content Sharing: Simple screen or file sharing for anyone in the meeting.
- AI Features: Noise suppression, speaker tracking, and inclusive layouts like Front Row make meetings smoother.
Together, these features make hybrid meetings feel natural for both in-room and remote participants.
Step 4: Integration with Microsoft 365
Because Teams Rooms is part of Microsoft 365, it connects easily with tools you already use:
- Scheduling: Book a room just like adding a colleague to a meeting invite.
- Collaboration Continuity: Chats, files, recordings, and transcripts stay tied to the meeting.
- Security: Rooms use Azure AD accounts, meaning they follow the same policies as your other devices.
- Management: IT can monitor and update rooms through Teams Admin Center.
- AI & Copilot: Features like automatic summaries, transcripts, and action items enhance meeting productivity.
Step 5: Key Takeaways and Next Steps
The success of Teams Rooms comes down to planning and purpose. Start small, measure impact, and expand:
- Assess your spaces: Identify which rooms need upgrades most.
- Pick your platform: Windows or Android Teams Rooms, depending on features and budget.
- Select hardware: Use pre-configured bundles or custom builds.
- Integrate with IT: Ensure smooth scheduling, security, and network setup.
- Train users: Highlight one-touch join and simple sharing to build confidence.
- Collect feedback: Adjust equipment or settings based on real user experiences.
Ready to Get Started?
By following these steps, you’ll transform meeting rooms into high-value spaces where collaboration thrives.
In today’s hybrid work world, the right investment in Teams Rooms pays off through time saved, better engagement, and more productive meetings. The best technology fades into the background, leaving your team free to focus on connecting, collaborating, and making decisions.
.avif)
.avif)